Orca Slicer Guide
Orca Slicer is an easy-to-use slicing software, and it works like a middleman between your 3D design and the printer to turn any digital model into real-world objects layer by layer, precisely.
In this guide, we’ll walk you through some of its most useful features, such as updating the software, adding supports, editing G-code, scaling models, changing print speed, switching nozzle sizes, cutting and merging objects, adding a pause during printing, and exporting your settings. So, let’s get started!
How this Advanced 3D Printing Slicer Works?
OrcaSlicer scans your 3D model and slices it into many thin horizontal layers. These sliced layers are then converted into a language that the 3D printer understands, called G-code. Orca creates optimized G-code containing detailed instructions on how the printer’s nozzle will move, how much filament will be used, the temperature settings, etc.
To avoid printing errors, this software shows the G-code preview of each layer after slicing. You can tweak layer height, print speed, enable supports, and other settings to get top-quality prints. After you’re satisfied with the settings, you export the G-code file and send it to your printer of any model via SD card, USB, or Wi-Fi.
How to update Orca Slicer?
To maintain print quality, you must use the latest version of the slicing software. Here is how you can update this program.
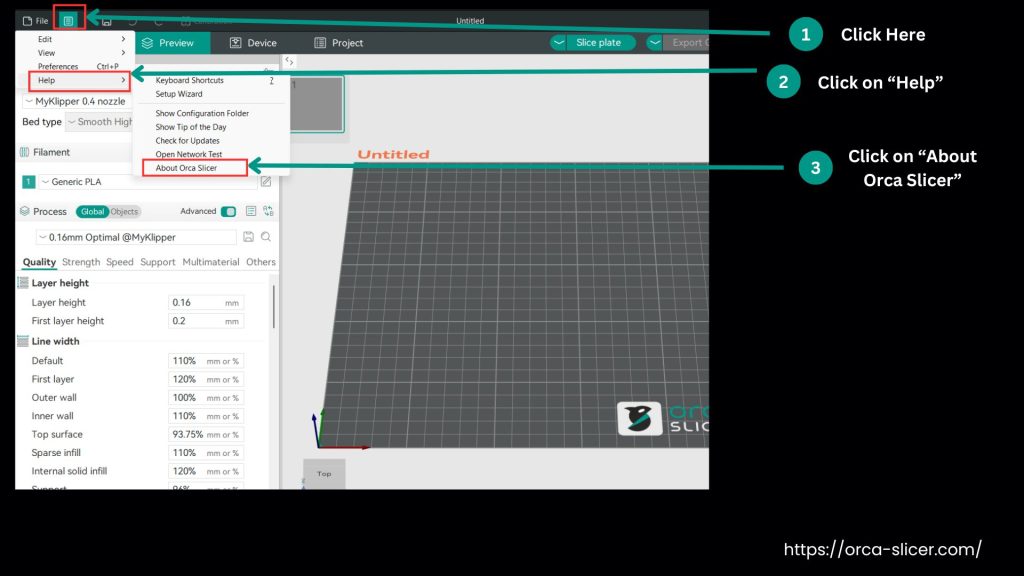
Check Your Current Version
- Before upgrading, find out which version you currently have.
- Open the Help or About section, where the version will be mentioned. Match it with the latest version available on our website or GitHub repository.

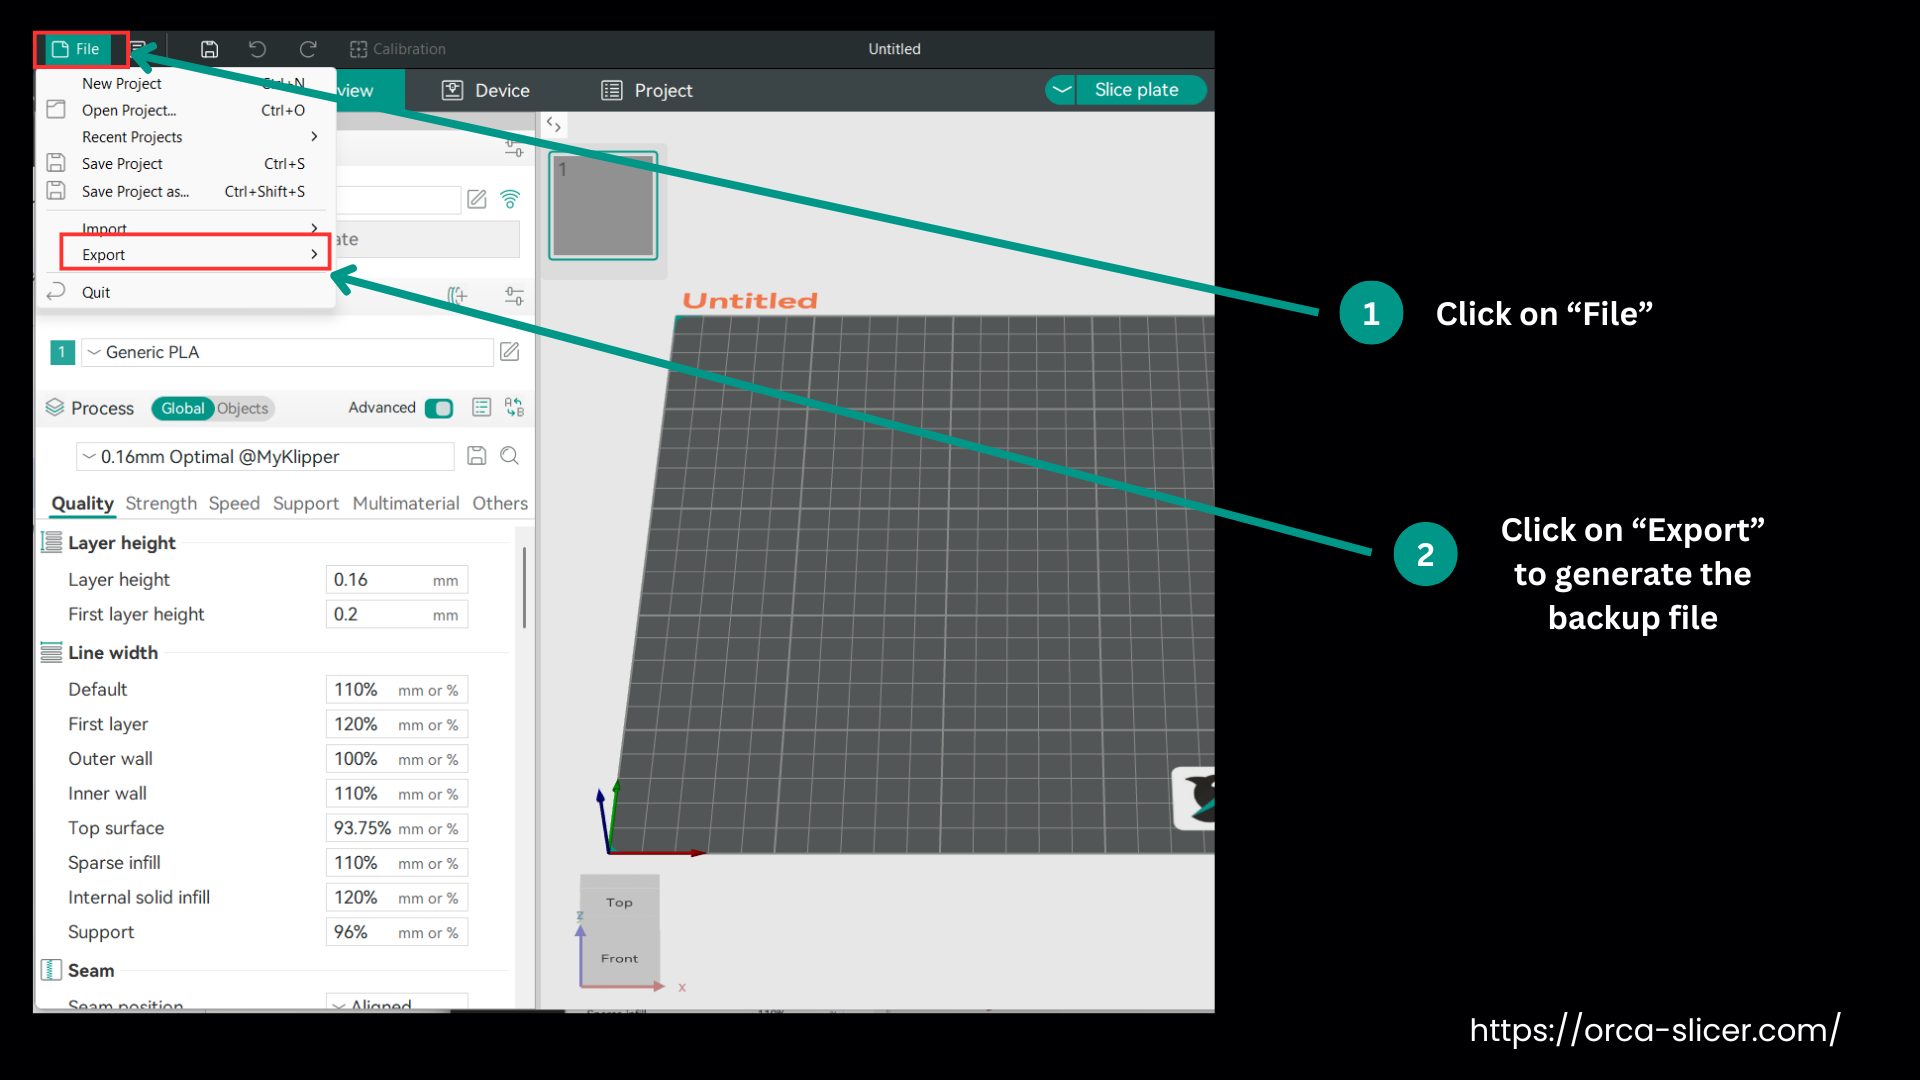
Back Up Your Settings
- Before updating to the latest version of any software, backing up is a wise strategy to save your data.
- In the toolbar, click on the File, then the Export option to generate a backup file.
- Always save the backup file in a safe location that is easy to restore from.
Download the Latest Version
- Visit our website to download the latest version of Orca Slicer for your system (Windows, Mac, or Linux).
- You can cross-check it with the official Orca Slicer GitHub Releases page.
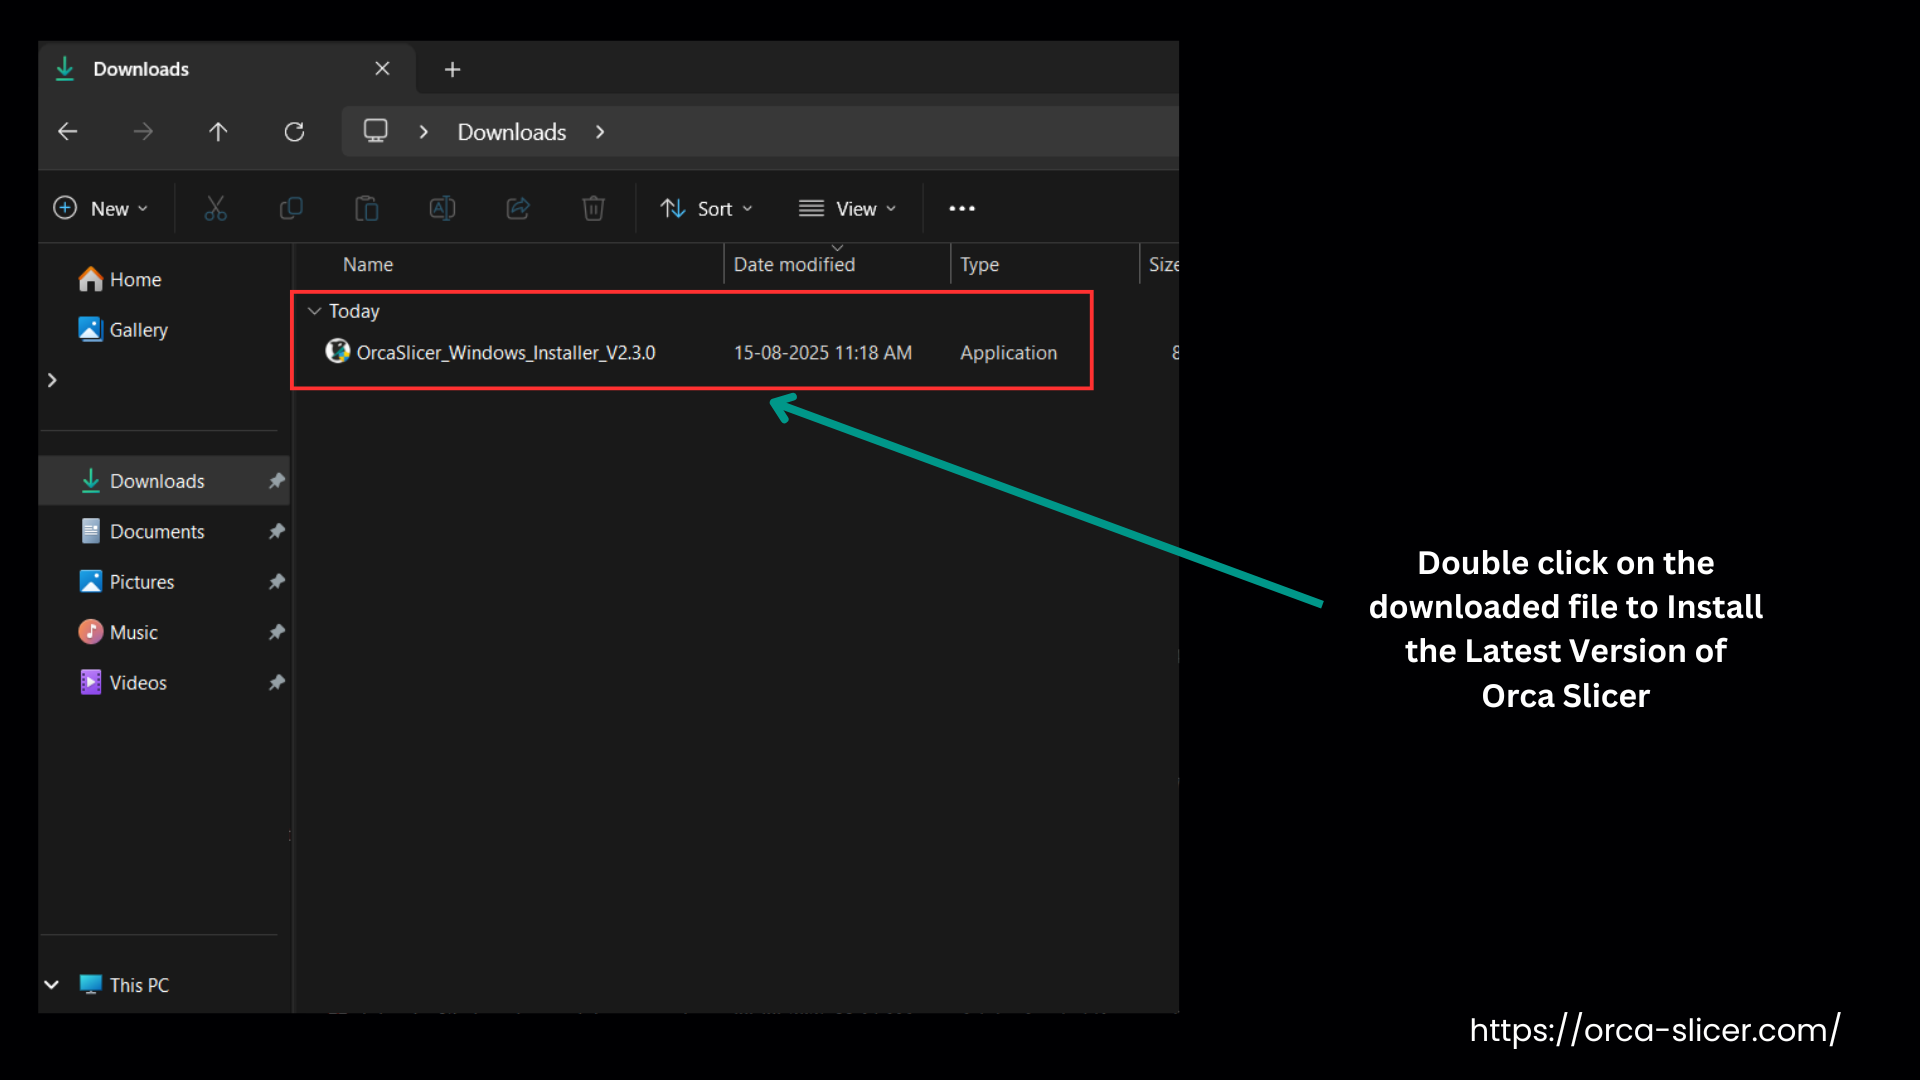
Install the Update
- Close Orca Slicer before installing.
- Find the downloaded file, and after double-clicking it, the installation will start.
- Keep following the instructions on your screen to install and launch the Slicer.
Verify the Update
- If you want to verify that you have installed the latest version, again, check it from the About or Help section.
- Check that all the claimed new features are working and that the bugs have been removed.
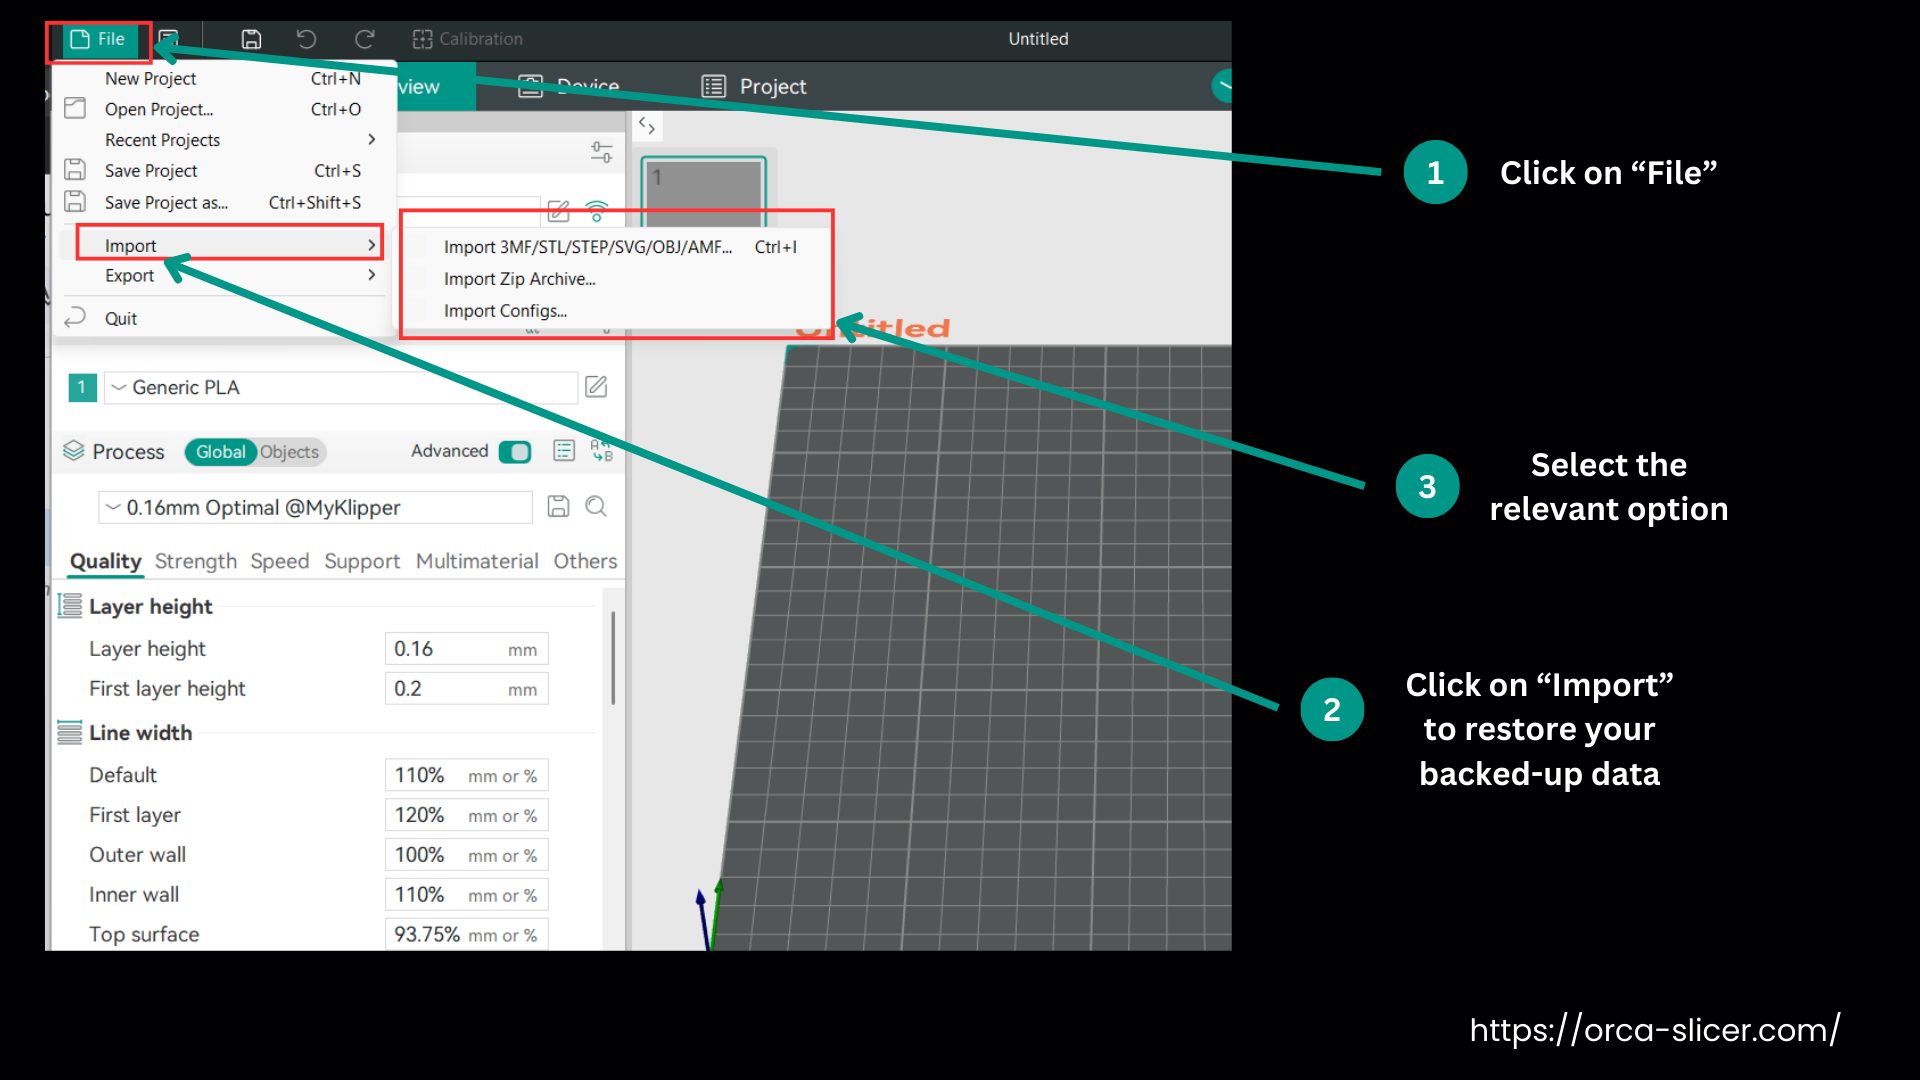
Restoring Your Backup
- While using the new version, if you need your backed-up data, you can restore it from the File and then the Import section.
How to Edit G-code in Orca Slicer?
You can edit the G-code to customize the printer to get higher-quality prints. Before editing, back up your data and first test the edited G-code on a small print.
Here’s how you can edit it:
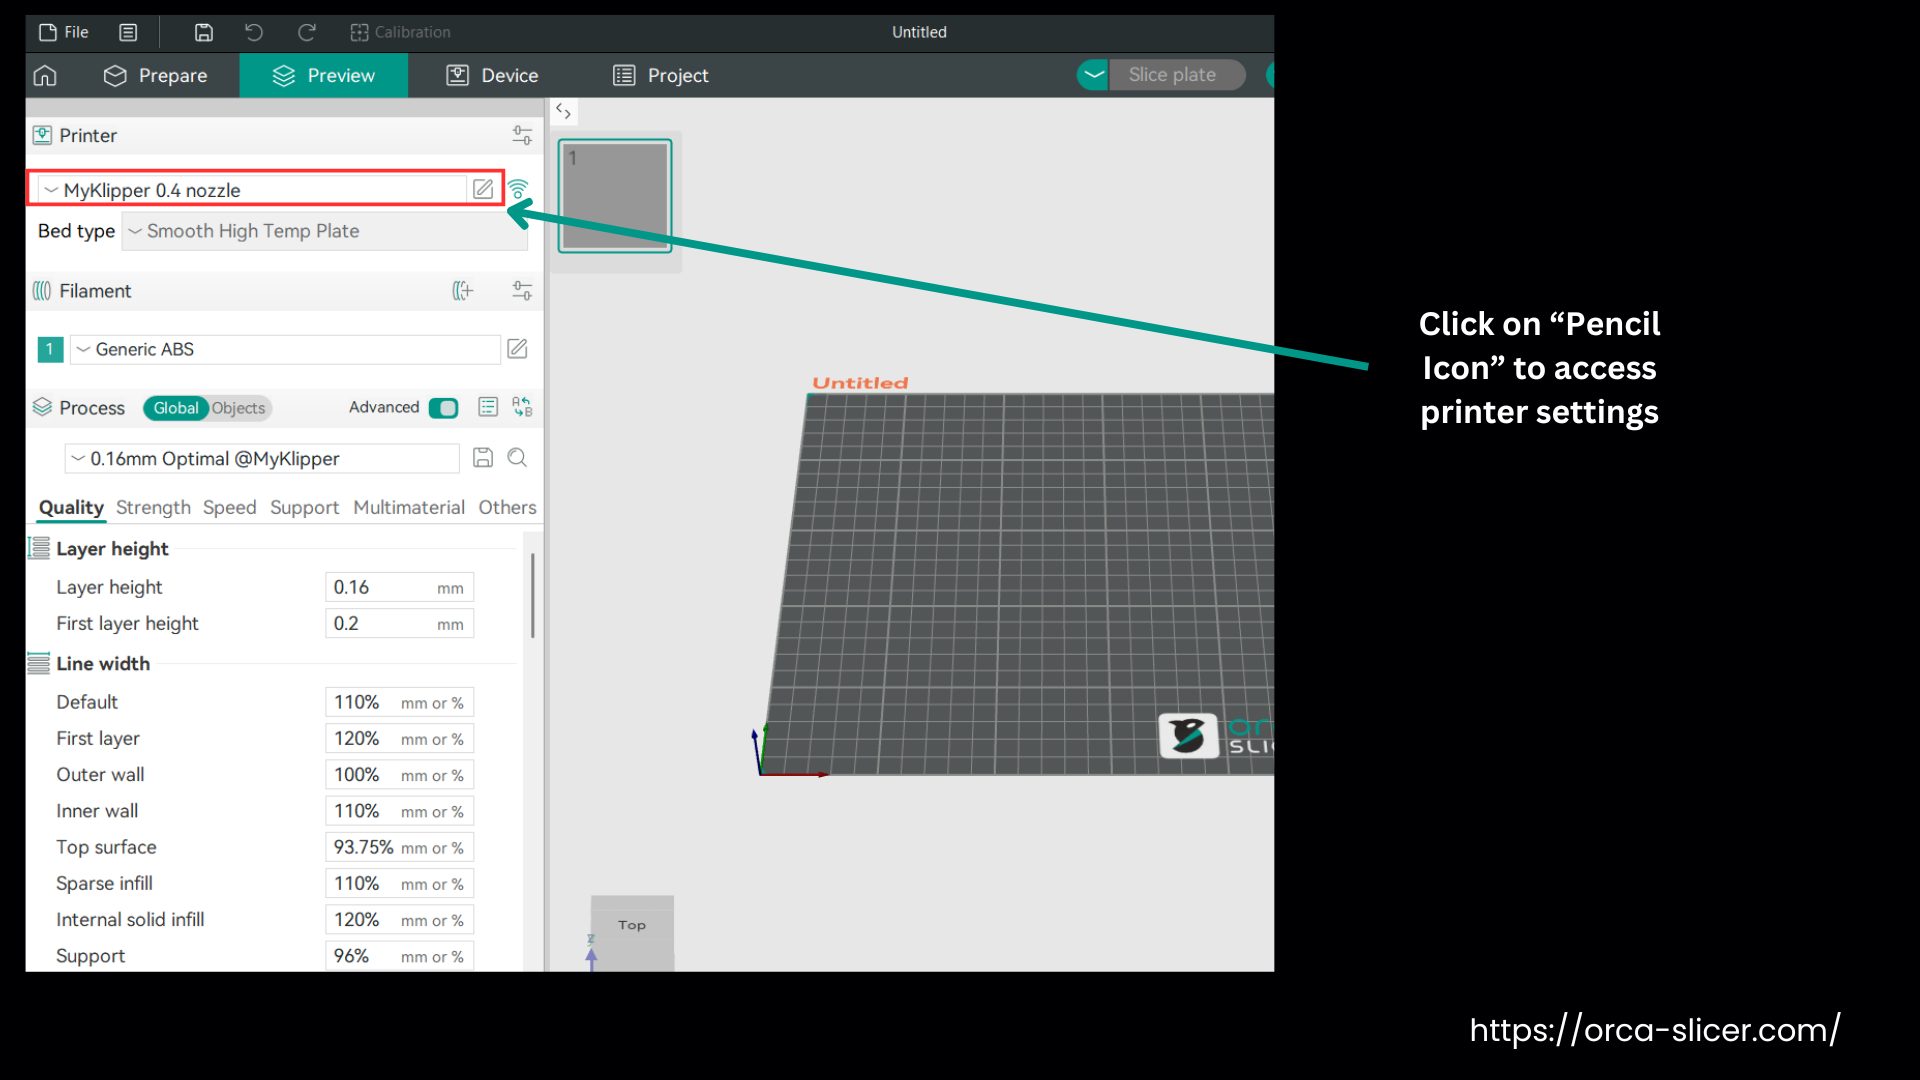
Method 1- Edit Start or End G-code inside Orca Slicer
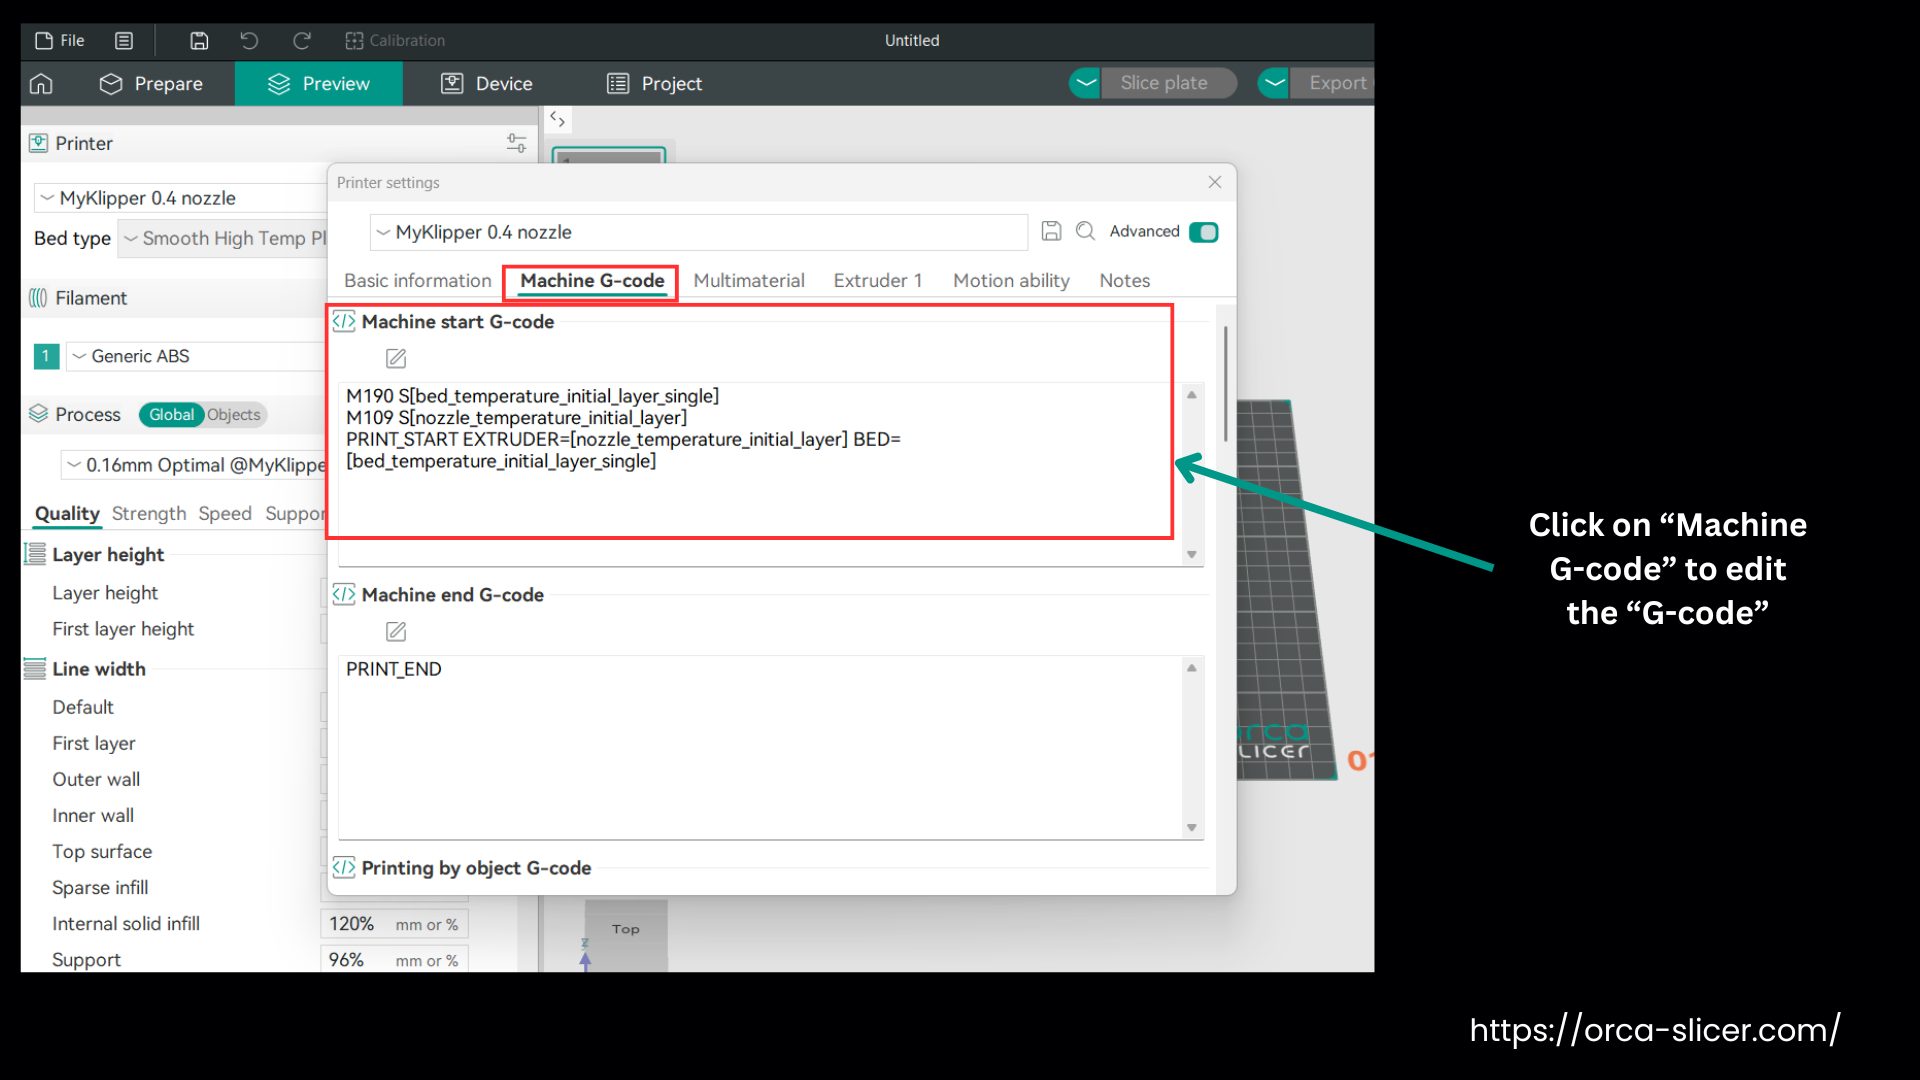
- Open Orca Slicer and go to Printer Settings, then Customize the G-code.
- Here you can change the scripts before starting G-code, like heating the nozzle or homing the printer head before printing starts. You can also set it to run commands after the print finishes, such as moving the nozzle away or turning off the heaters.
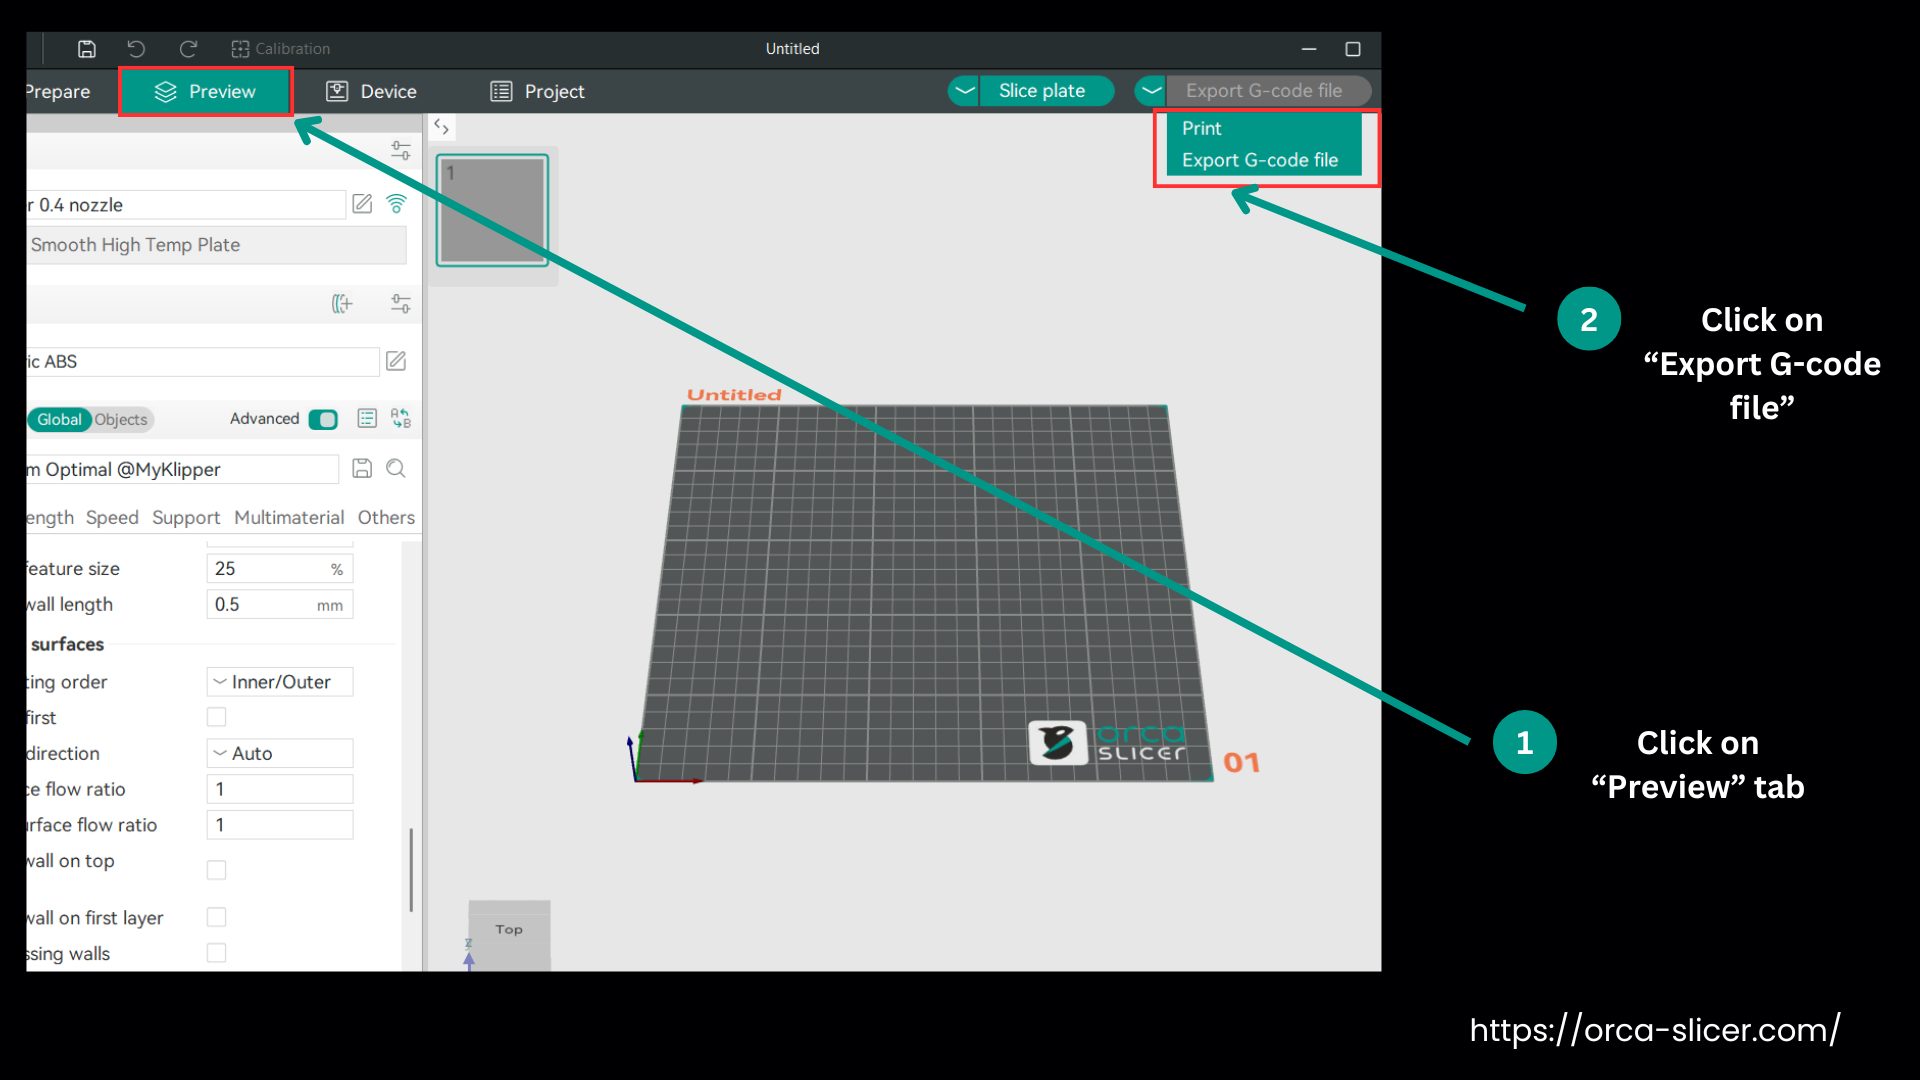
Method 2- Edit the saved G-code file
- Slice your model like normal.
- Head to the Preview tab, then select Export G-code
- You can open the saved G-code file by using a text editor like Notepad++ or VS Code.
- Now you can edit or add the commands like
- M25 → pause the print.
- M104 S210 → set nozzle temp to 210°C.
- M106 S255 → turn the fan on full speed.
Method 3- Add commands at a specific layer
- In the exported G-code, search for a line like: LAYER:10.
- Add your command right after it so it can run at that layer.
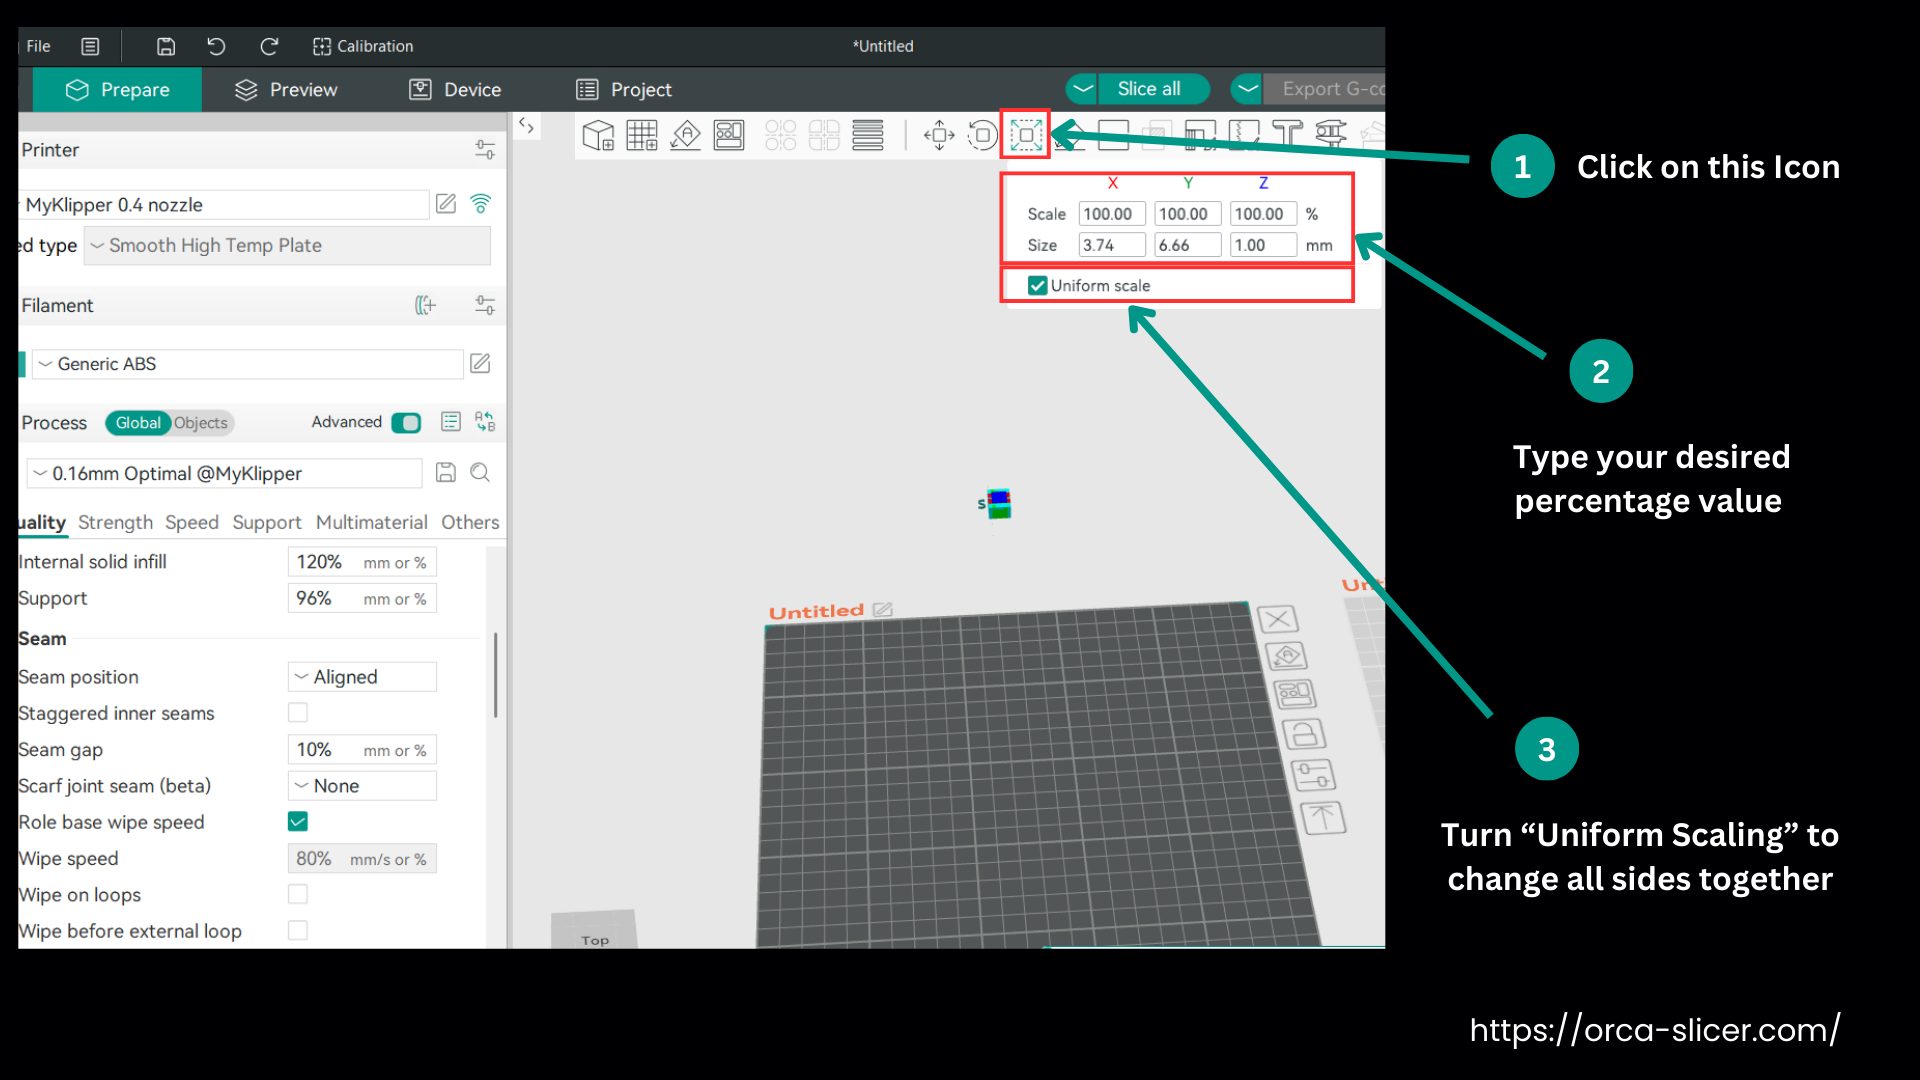
How to Shrink or Scale in OrcaSlicer?
Shrinking or scaling any print is needed when your model is too big or too small for your printer. You can easily resize it in Orca Slicer by following these steps.
- Open Orca Slicer and load the model that you want to resize. Click the model to get it selected. The size of the model is changed with the Scale tool in the side toolbar.
- You will type a percentage to set the size. If you want to shrink it, then type a digit under 100% and for a large size, type a number above 100%. You can simply drag the scale handles to adjust it visually.
- If you want to change all sides together, then turn on the Uniform Scaling. Turn it off to resize width, height, or depth on its own. Use the preview to check that the model fits the build plate and looks right. When you’re happy, slice and export the G-code.
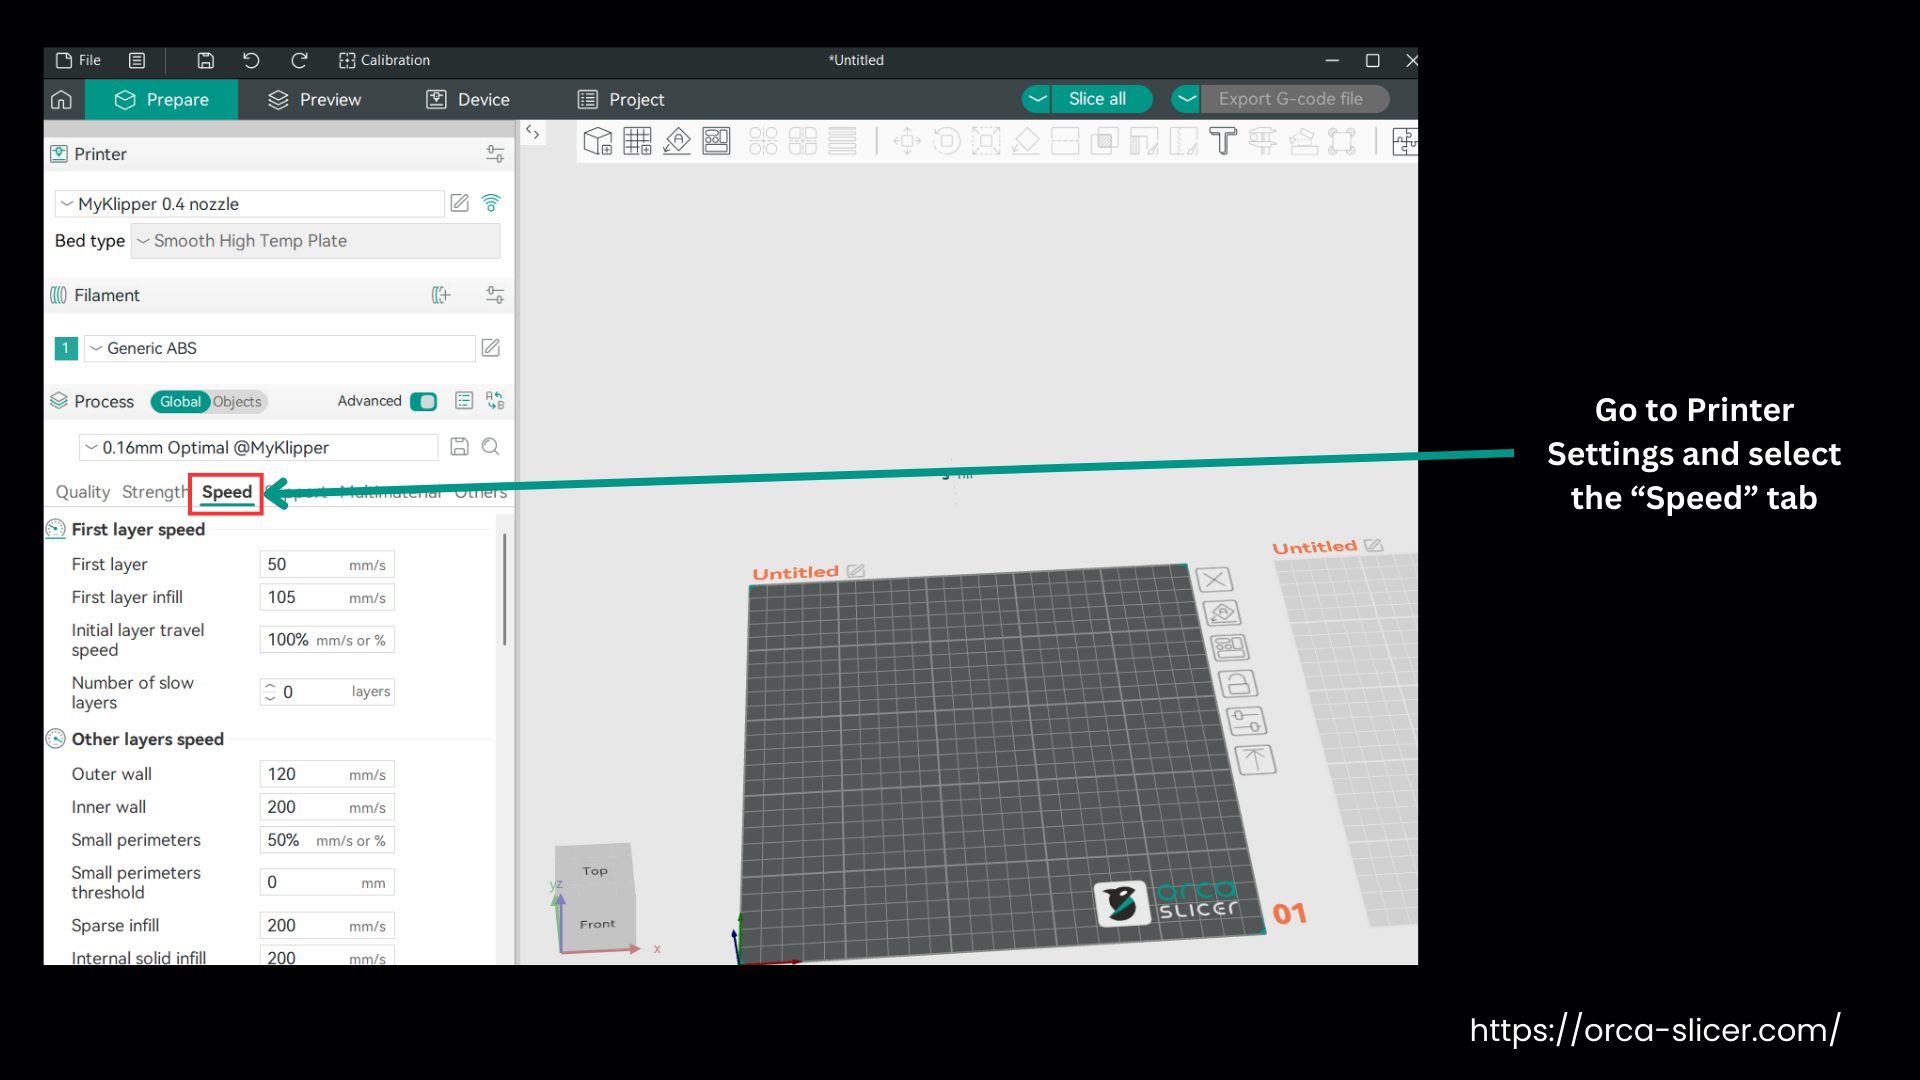
How to Change Print Speed in Orca?
Open your model in Orca Slicer and switch to the Print Settings tab. Scroll to or search for the Speed section. Here, you can adjust the speeds for each part of the print:
- Perimeters: outer and inner walls. Some users set these slower for better quality, for example, 25 mm/s if the infill is 50 mm/s.
- Infill: the internal structure. This is often faster than walls, such as 50 mm/s in the example above.
- Supports: the support material. You can match these to infill speed or slow them slightly if detail matters.
- Travel: non-printing moves. These can usually stay fast.
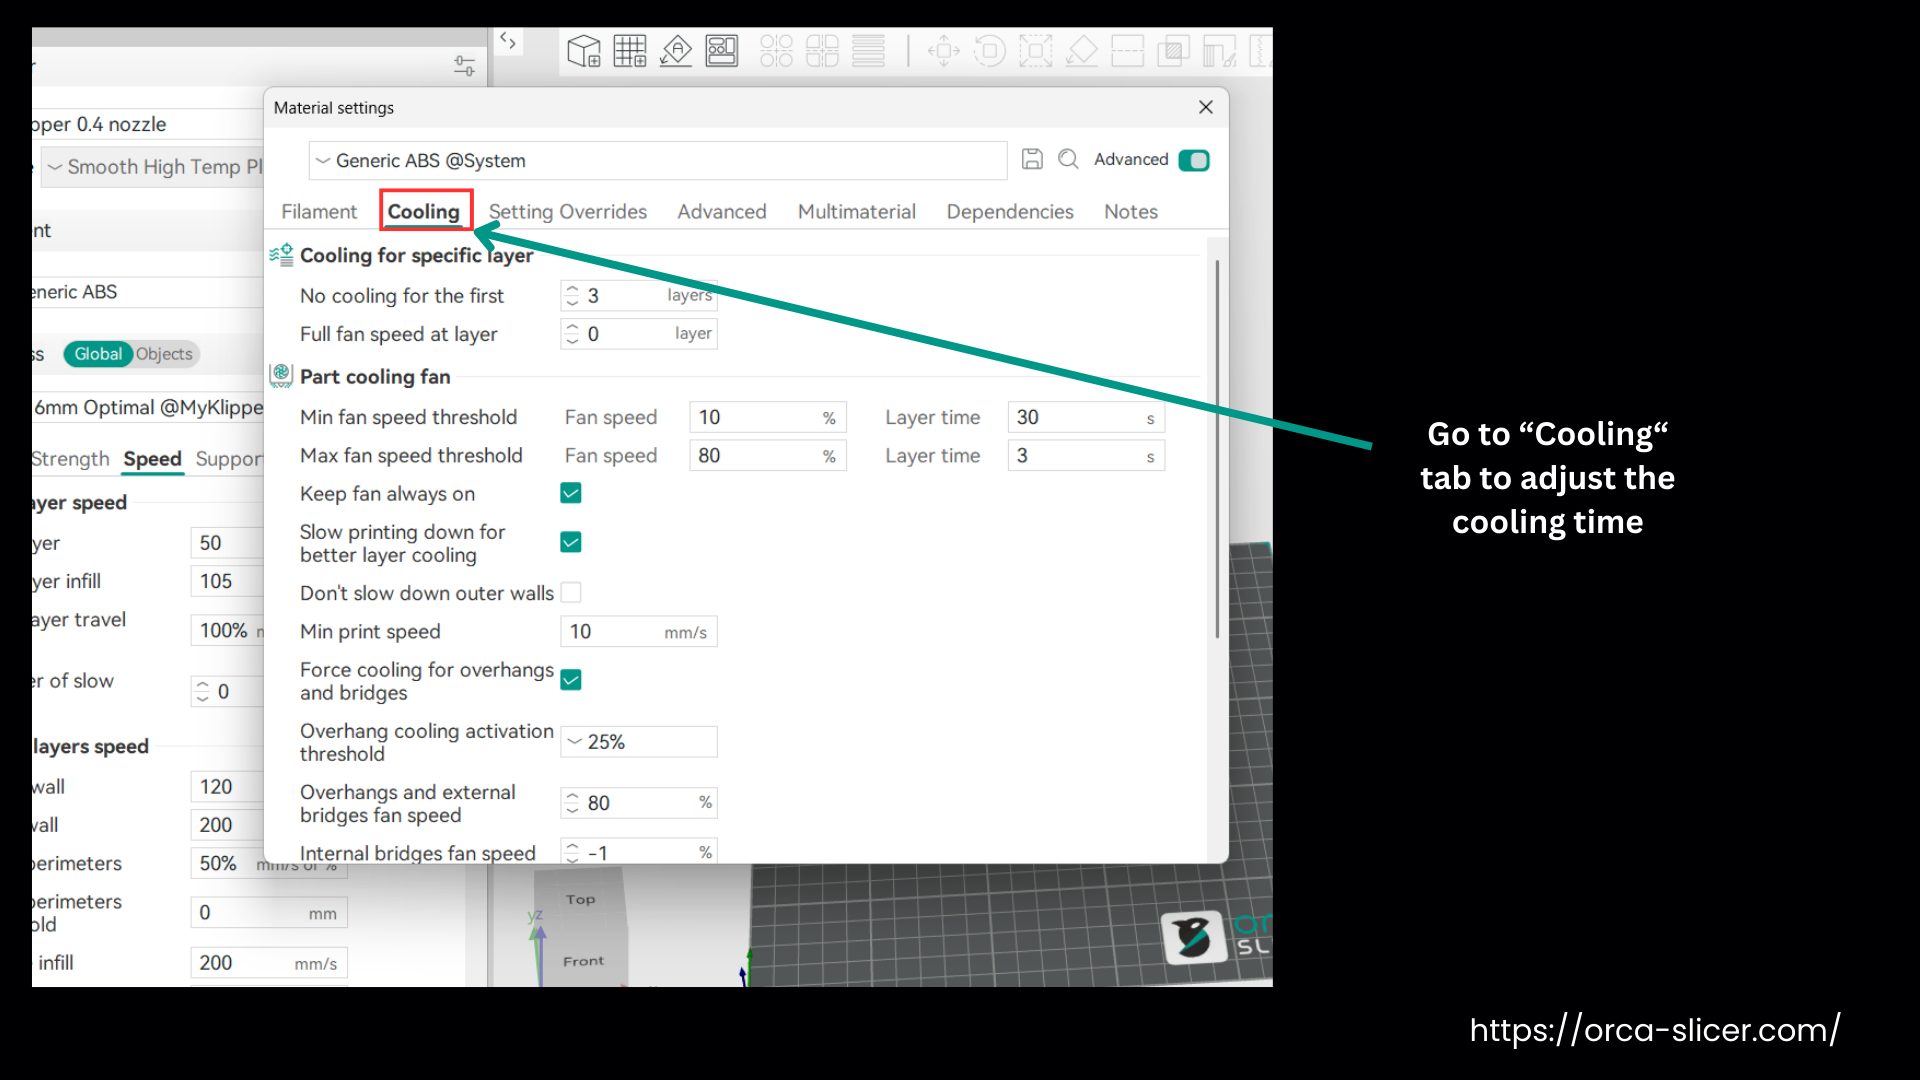
Keep in mind, Orca may automatically slow down on very small layers to give them time to cool. You can adjust this in Cooling → Minimum Layer Time. If your hot end can’t melt filament fast enough, Orca will limit speed based on the maximum volumetric flow in your printer profile, so check that if speeds don’t seem to match your settings.
At the backend, it’s the acceleration settings that control the printer’s speed. If the acceleration is low, the printer won’t reach the speed you set, especially on small or short movements.
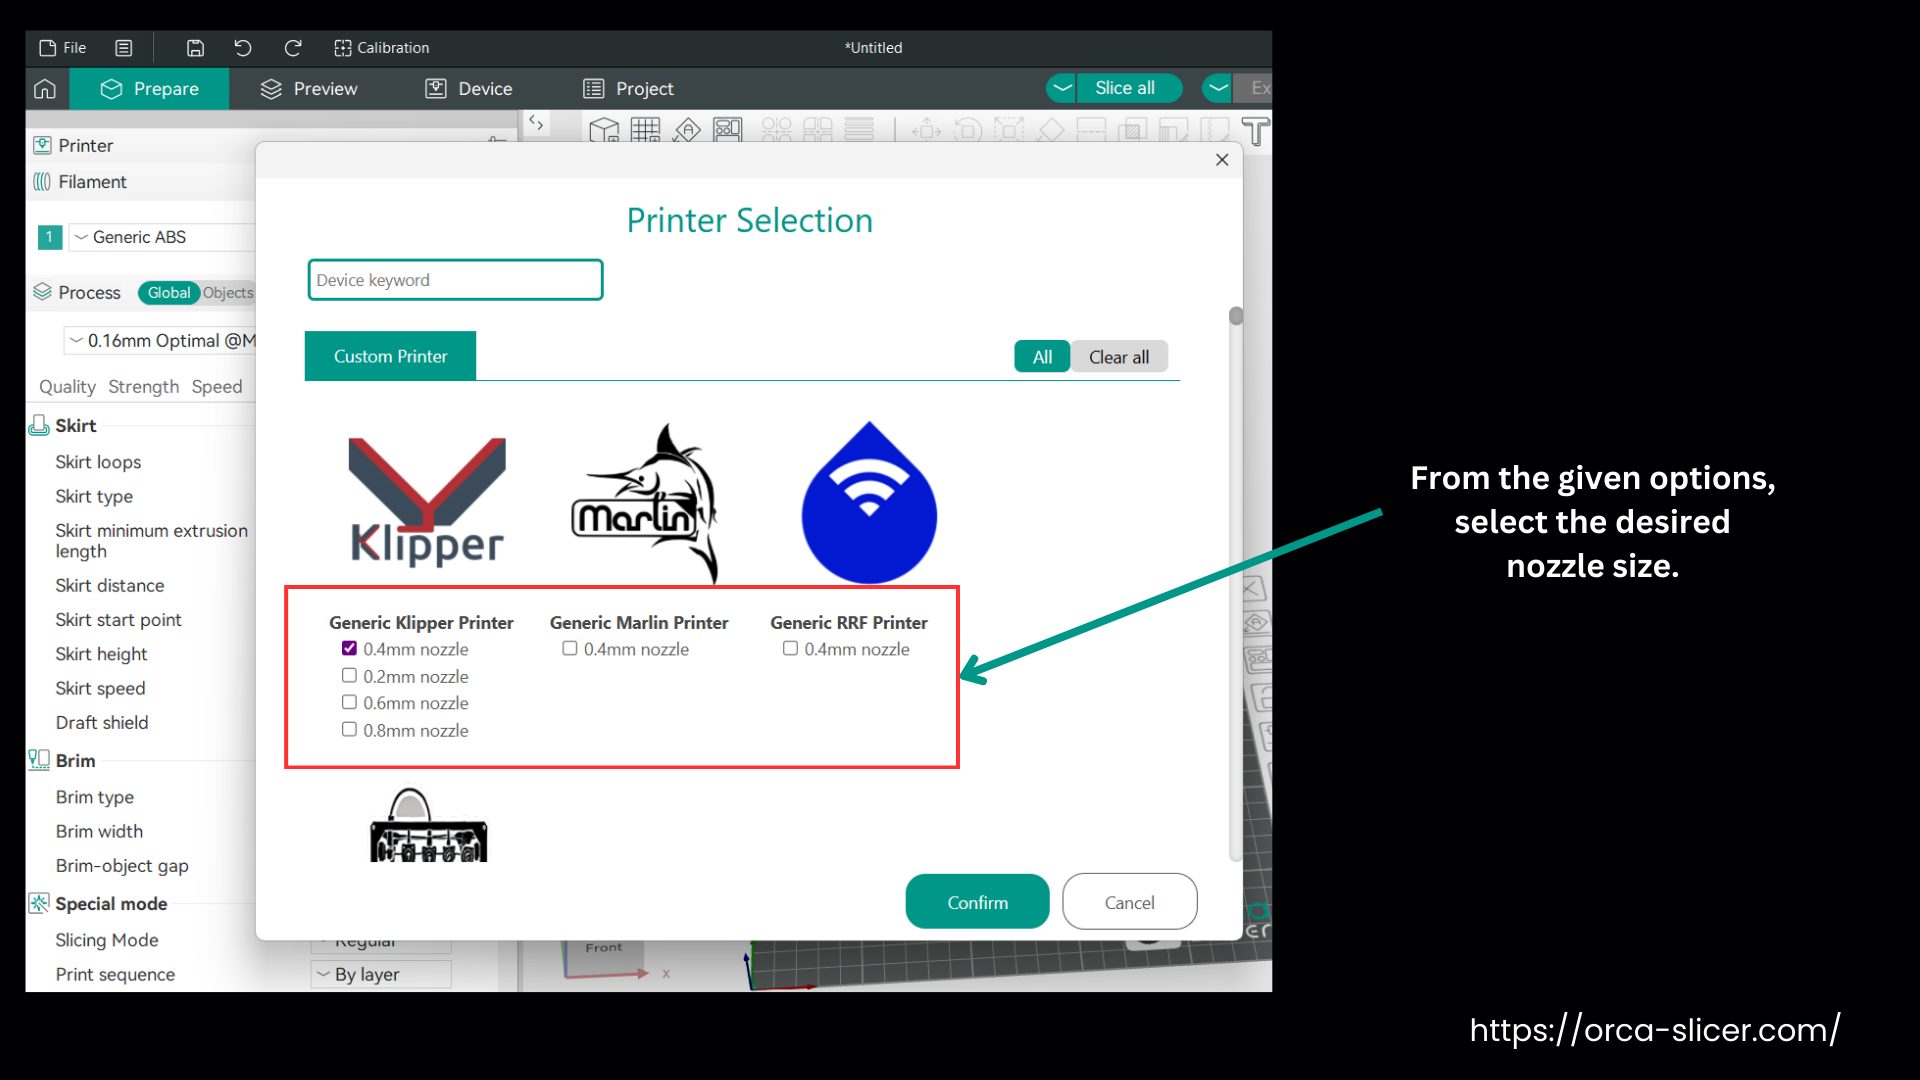
How to Change Nozzle Size in Orca Slicer?
In Orca, you often have to change the nozzle size. For a fine detailed model, you have to reduce the nozzle size, while to speed up the printing, you can increase its size. Nozzle sizes range from 0.2 mm for very slow printing but fine quality prints to 0.8 mm to get fast prints at the cost of sacrificing the printing details.
Now that you know why nozzle size matters, here’s a simple way to change it:
- Launch Orca Slicer on your computer and open your Printer Profile.
- Head over to Printer Settings and from the Nozzle Diameter option, pick the nozzle size you want from the list, then hit Save to keep the changes.
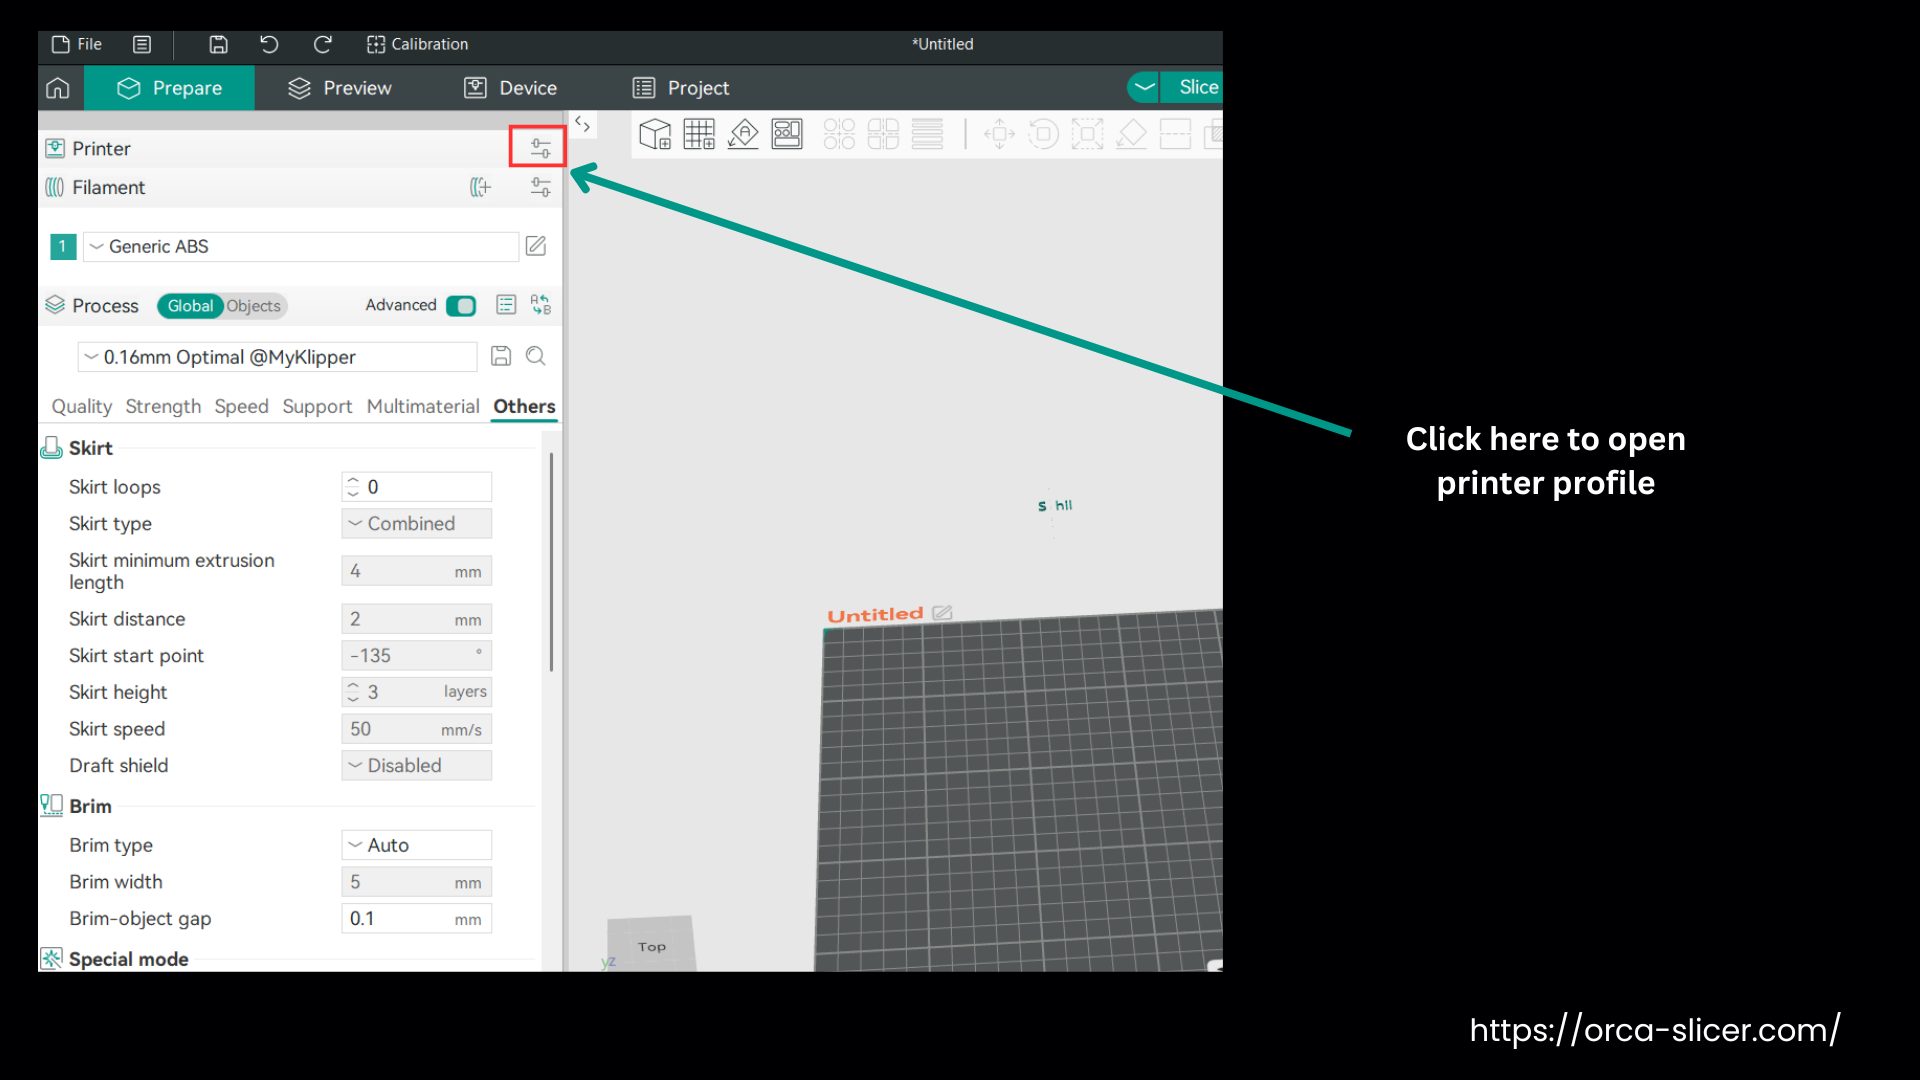
Once you swap the nozzle, fine-tune settings like layer height, speed, and extrusion so they match. If you skip that step, you may lose both quality and speed.
How to Cut in OrcaSlicer?
Here is how you can cut your model precisely with this slicing software. Moreover, learn how to add connectors so the parts can click together or be glued together.
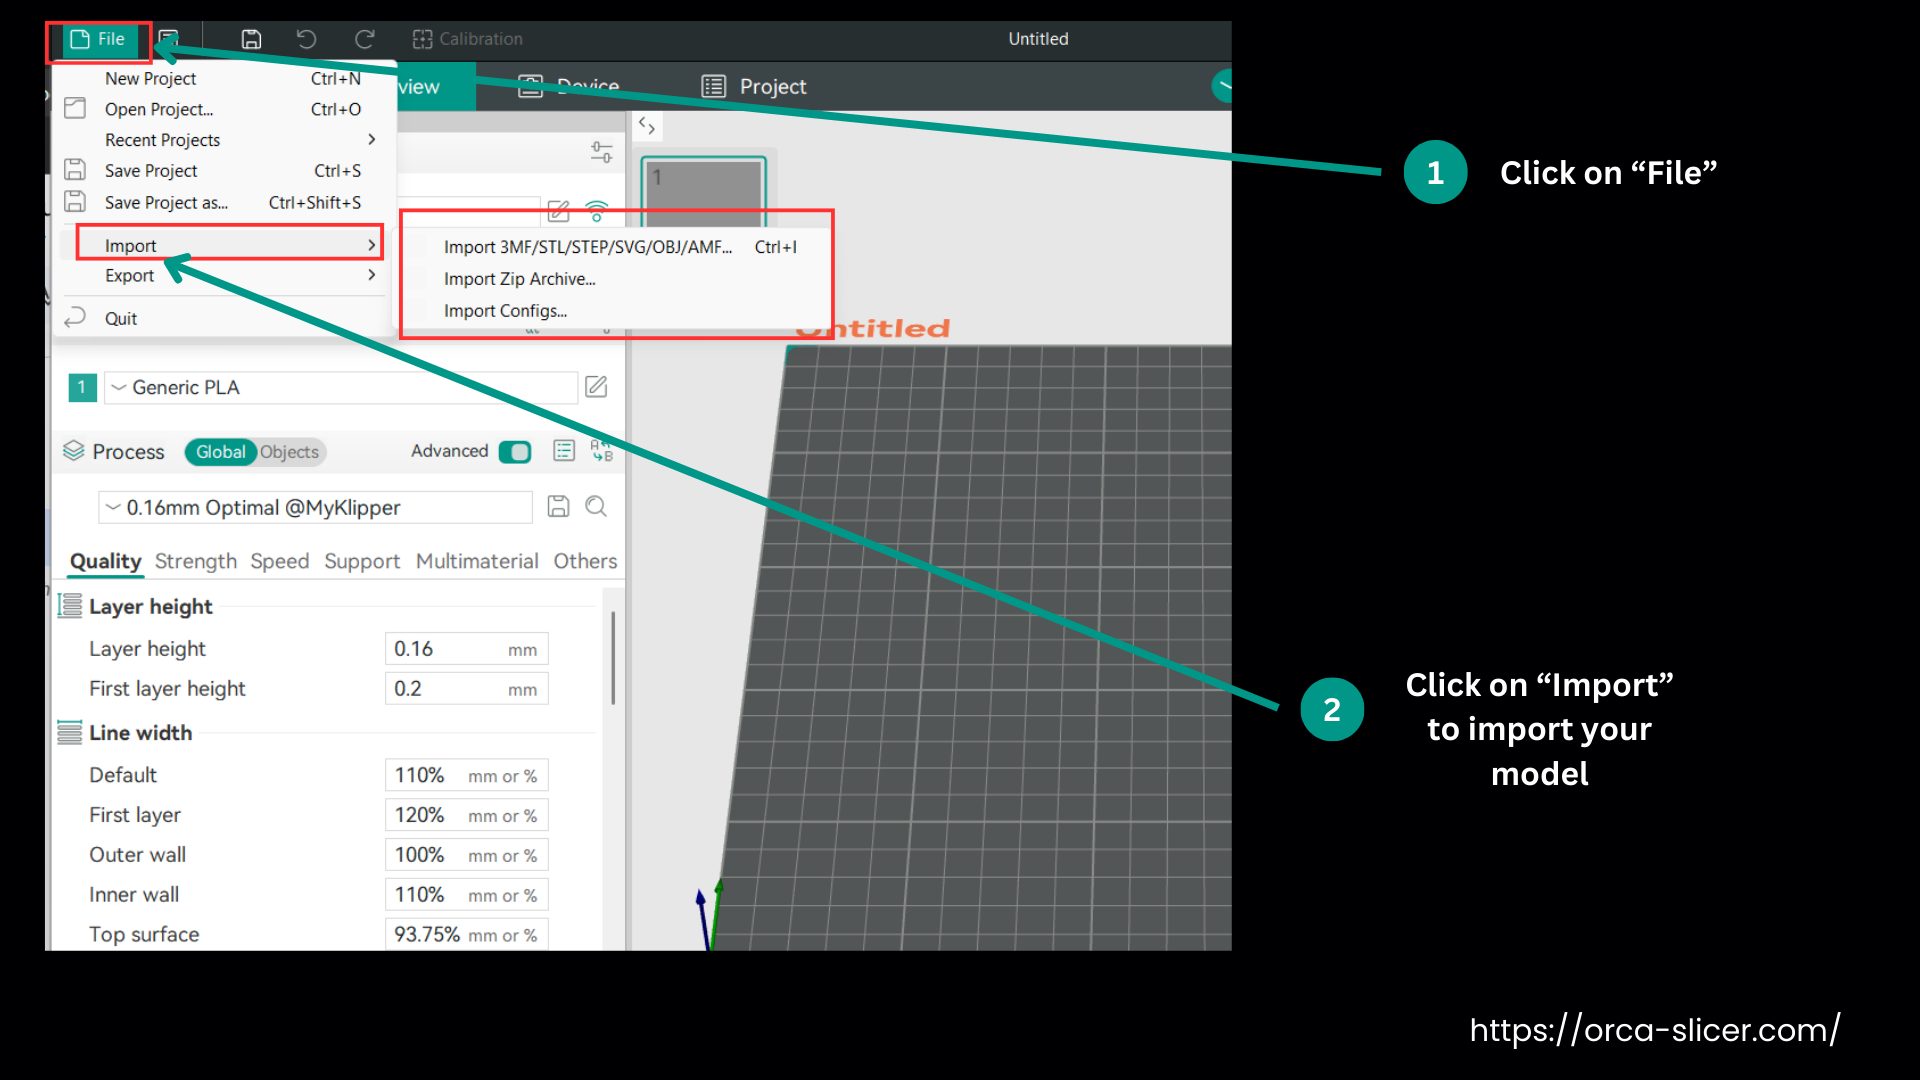
Open Orca Slicer
- The first step is to open Orca Slicer.
Bring in Your Model
- Import your model into the slicer. Orca Slicer is updated often, so the interface may look different depending on your version.
- In earlier versions, there used to be a dedicated cut button, which was replaced by the latest shortcuts in new versions.
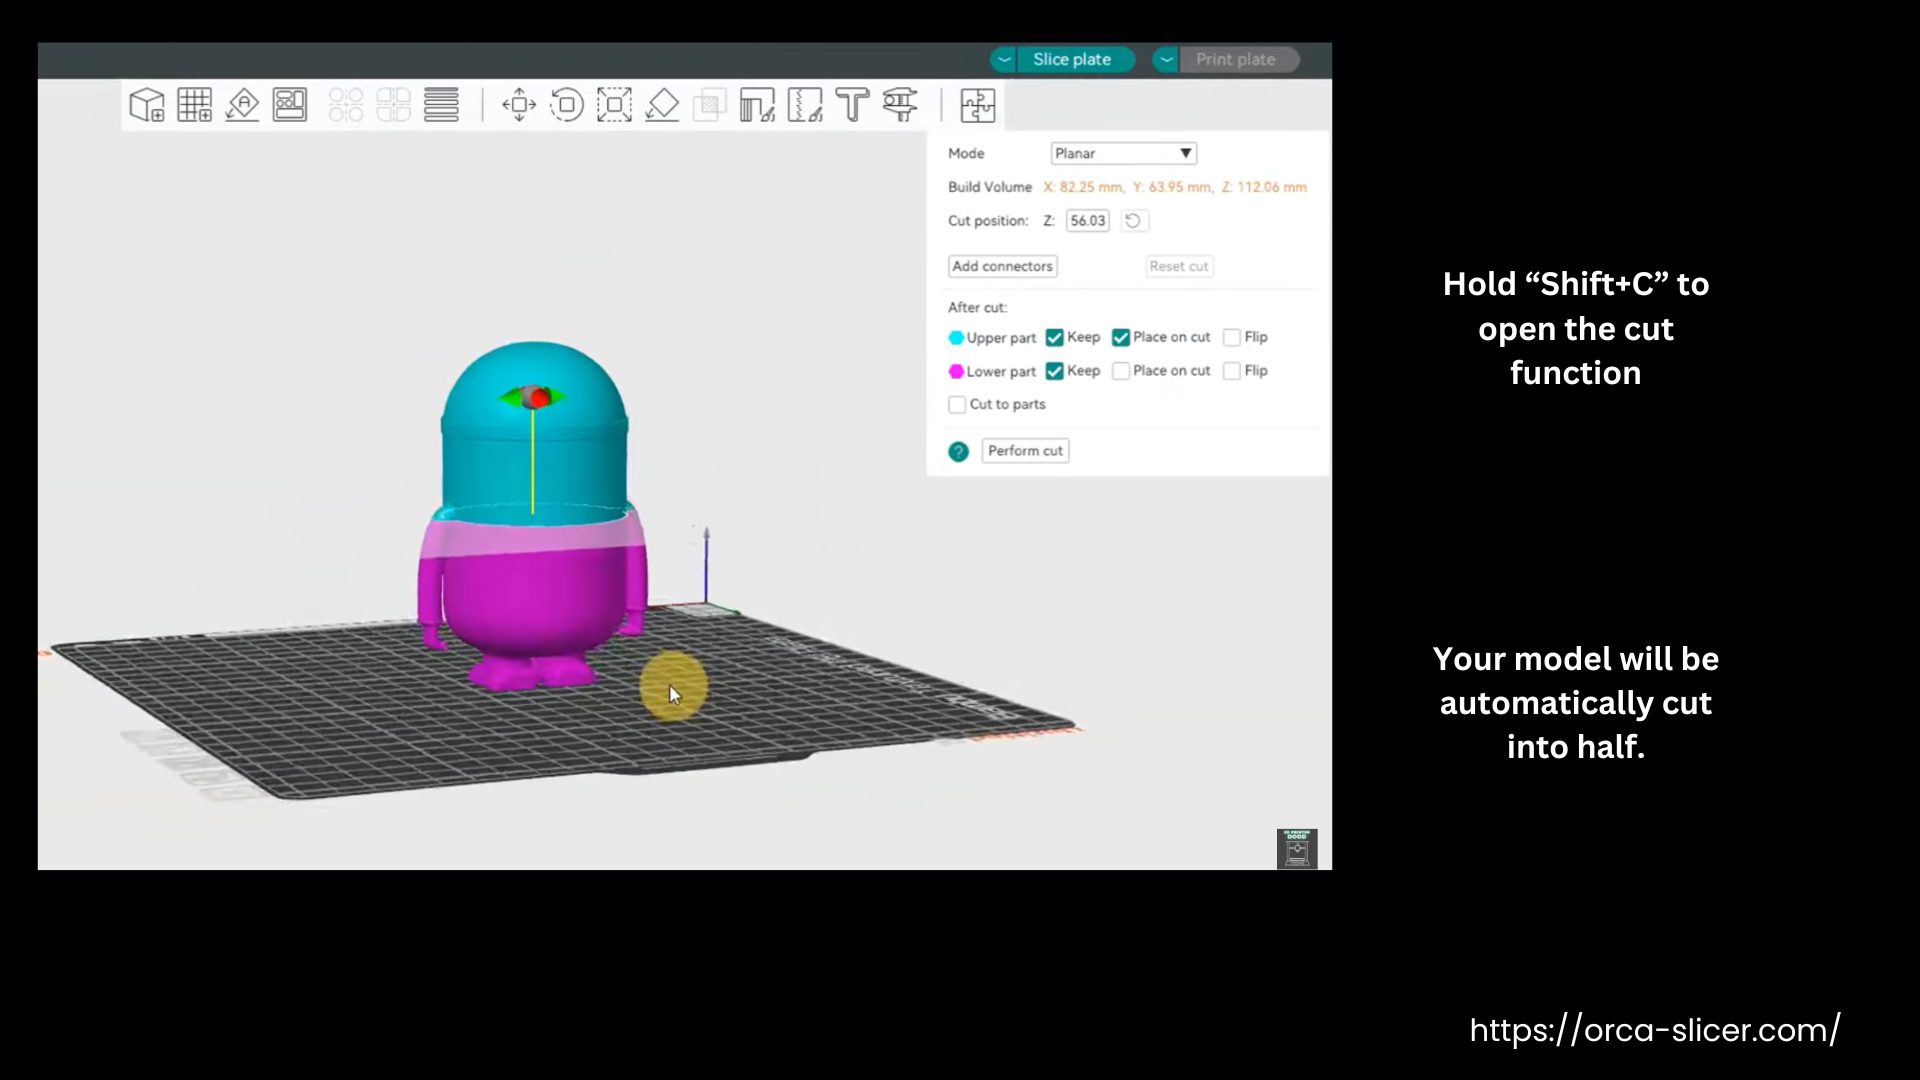
Open the Cut Function
- Highlight your model by clicking on it. Then hold Shift + C to open the cut function. The Slicer will automatically cut your model in half.
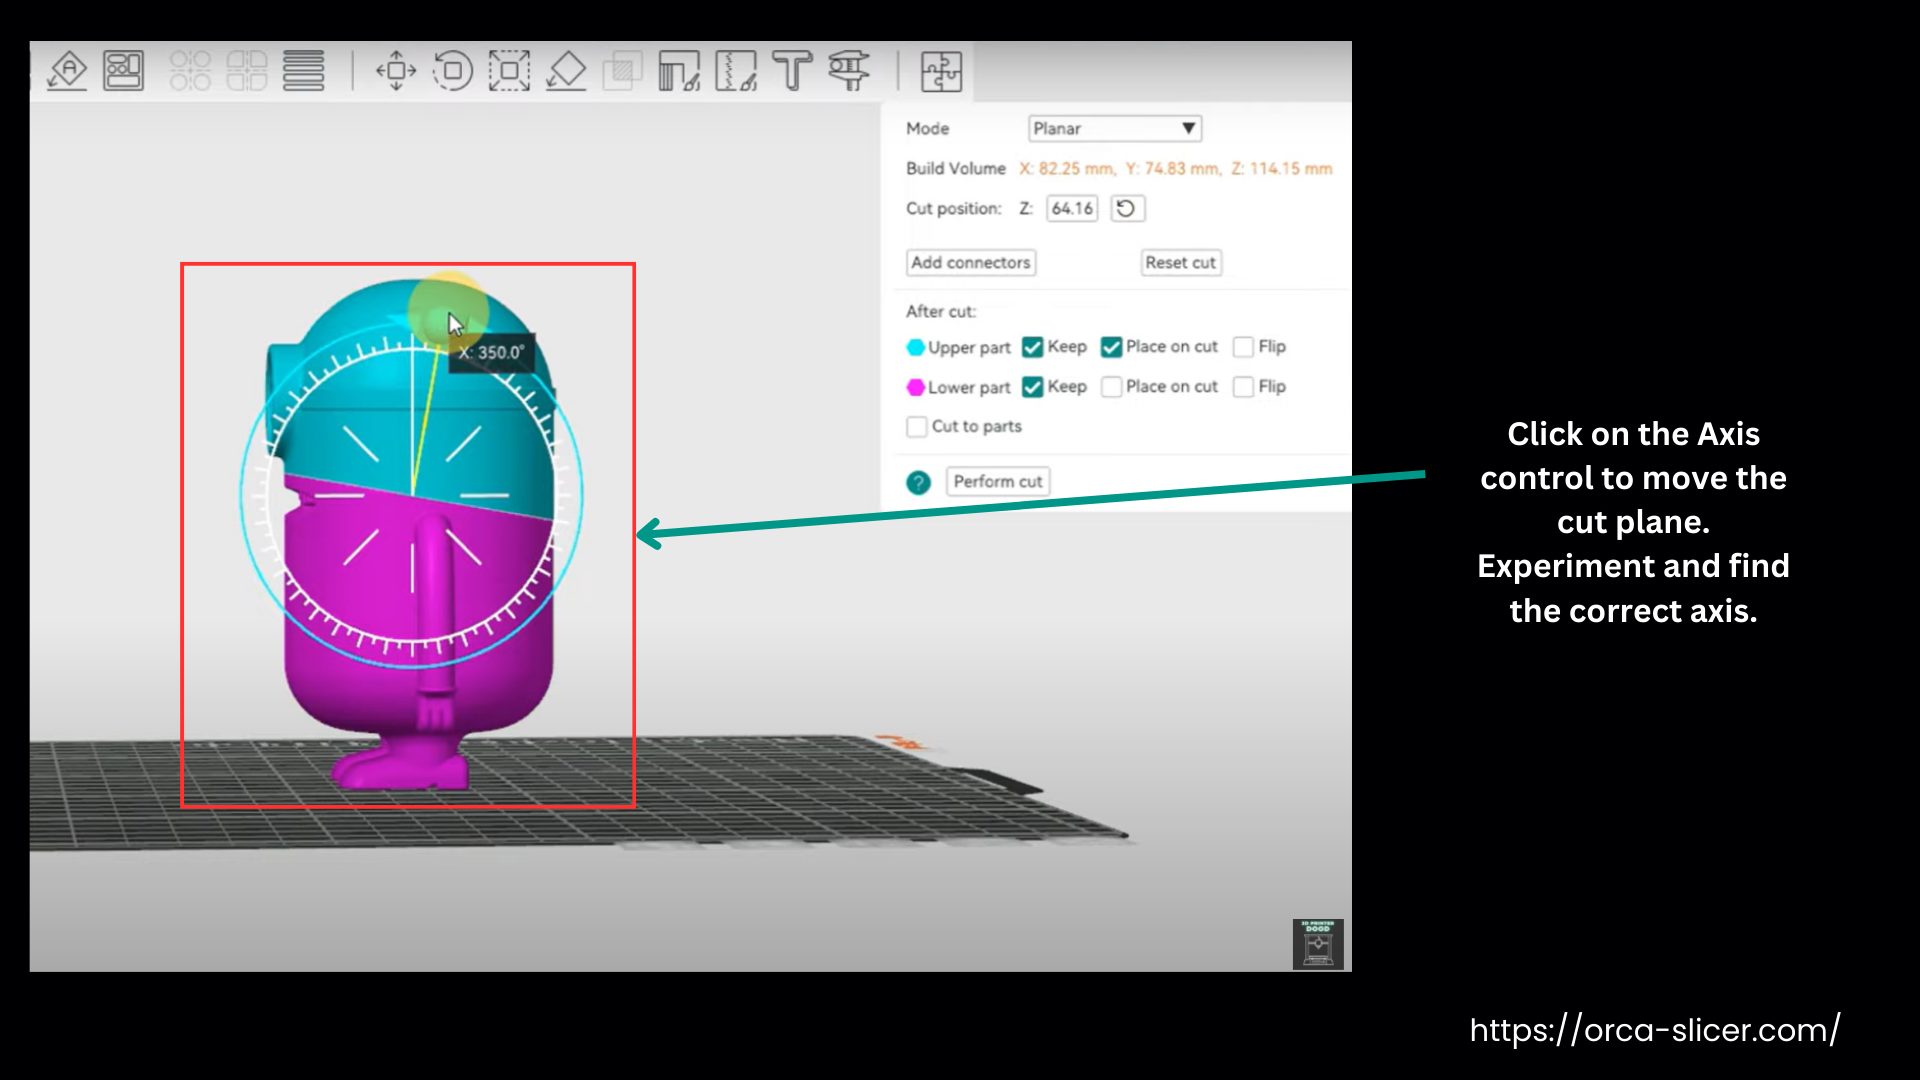
- Take a look at the cut line. If it doesn’t look ideal, click on the axis controls and move the cut plane. You may need to experiment to find the correct axis. Once you have the right one, lift the cut above the arms.
- If the cut line ends up in another awkward place, use the other axis controls to adjust the position and angle of the cut until you’re happy with it.
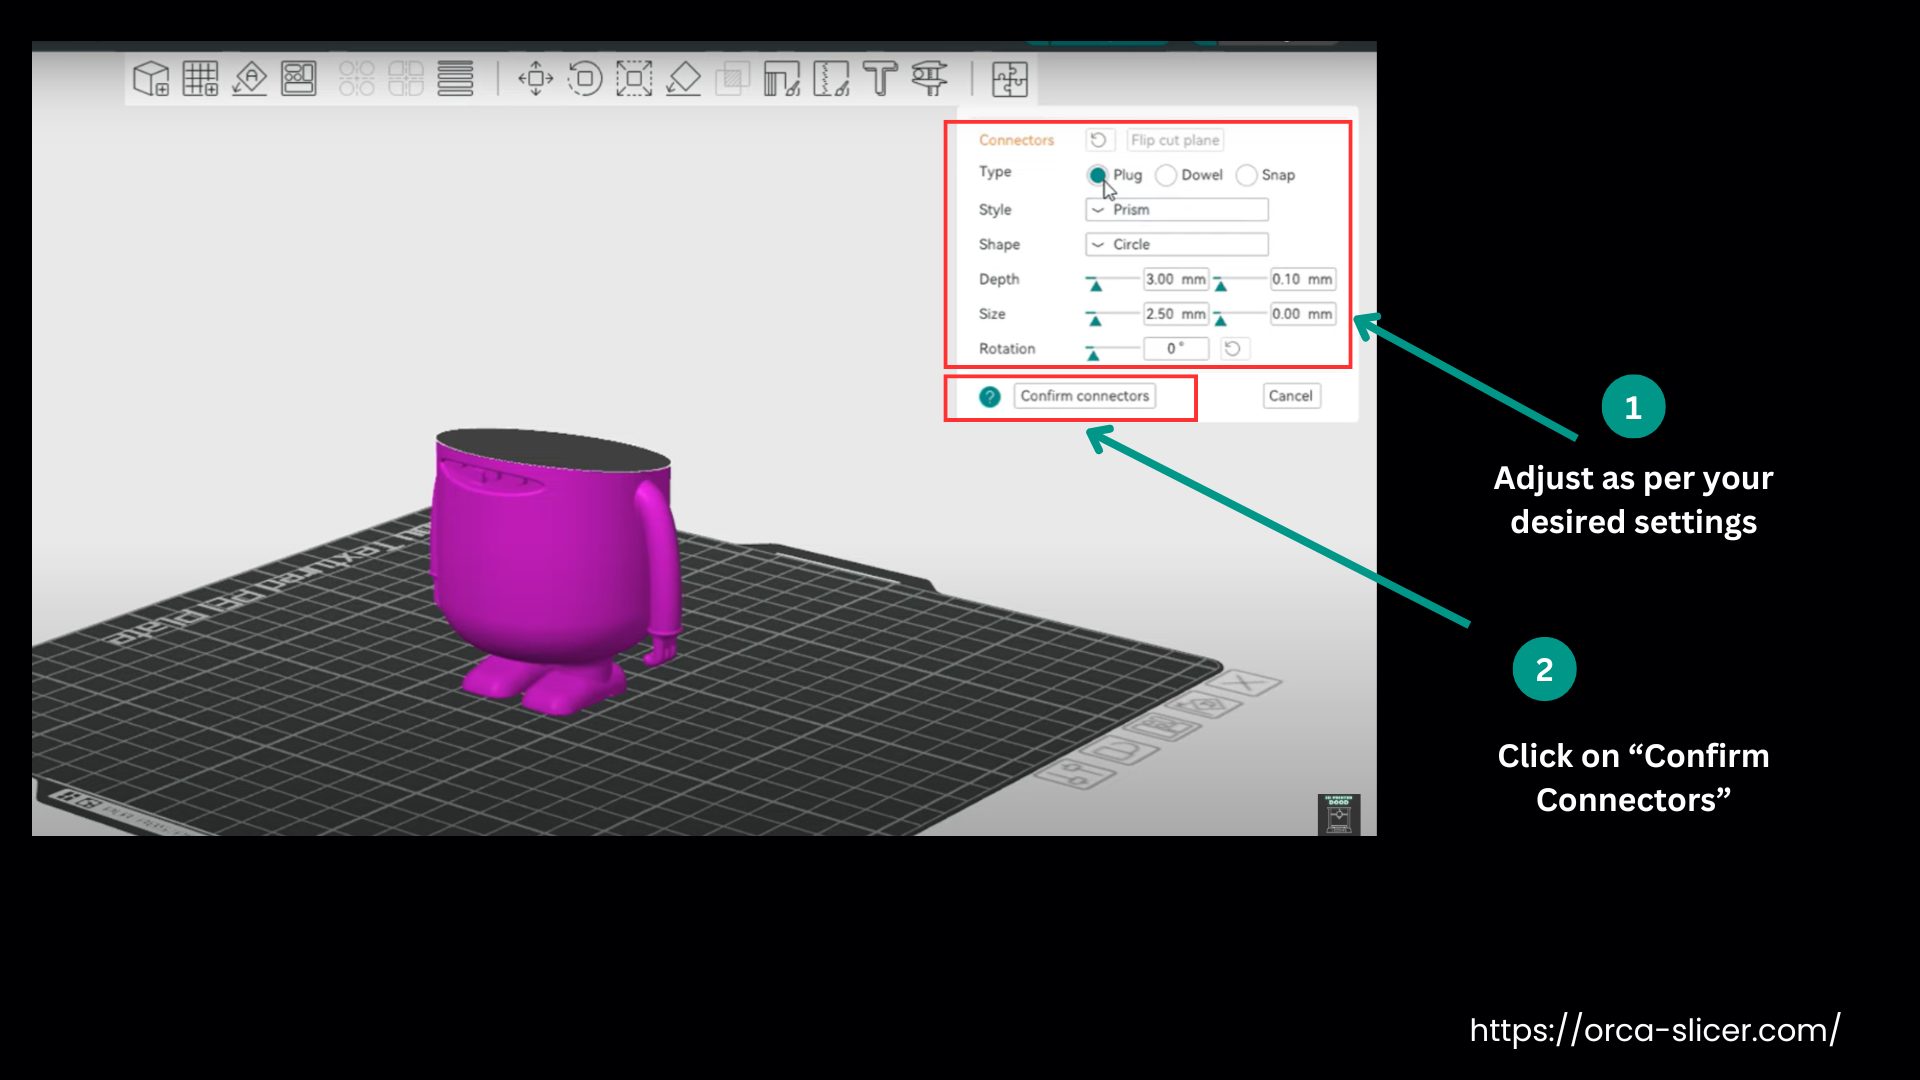
Add Connectors
- Click on the Connectors option if you want to add them. Click where you want them to be placed. You can resize it by adjusting the values or dragging the slider. More depth means a stronger connection. You can also change the connector shape to something like a hexagon for extra strength.
- When you’re happy with the settings, click Confirm Connectors. Your model will appear whole again, but the connectors will be applied internally.

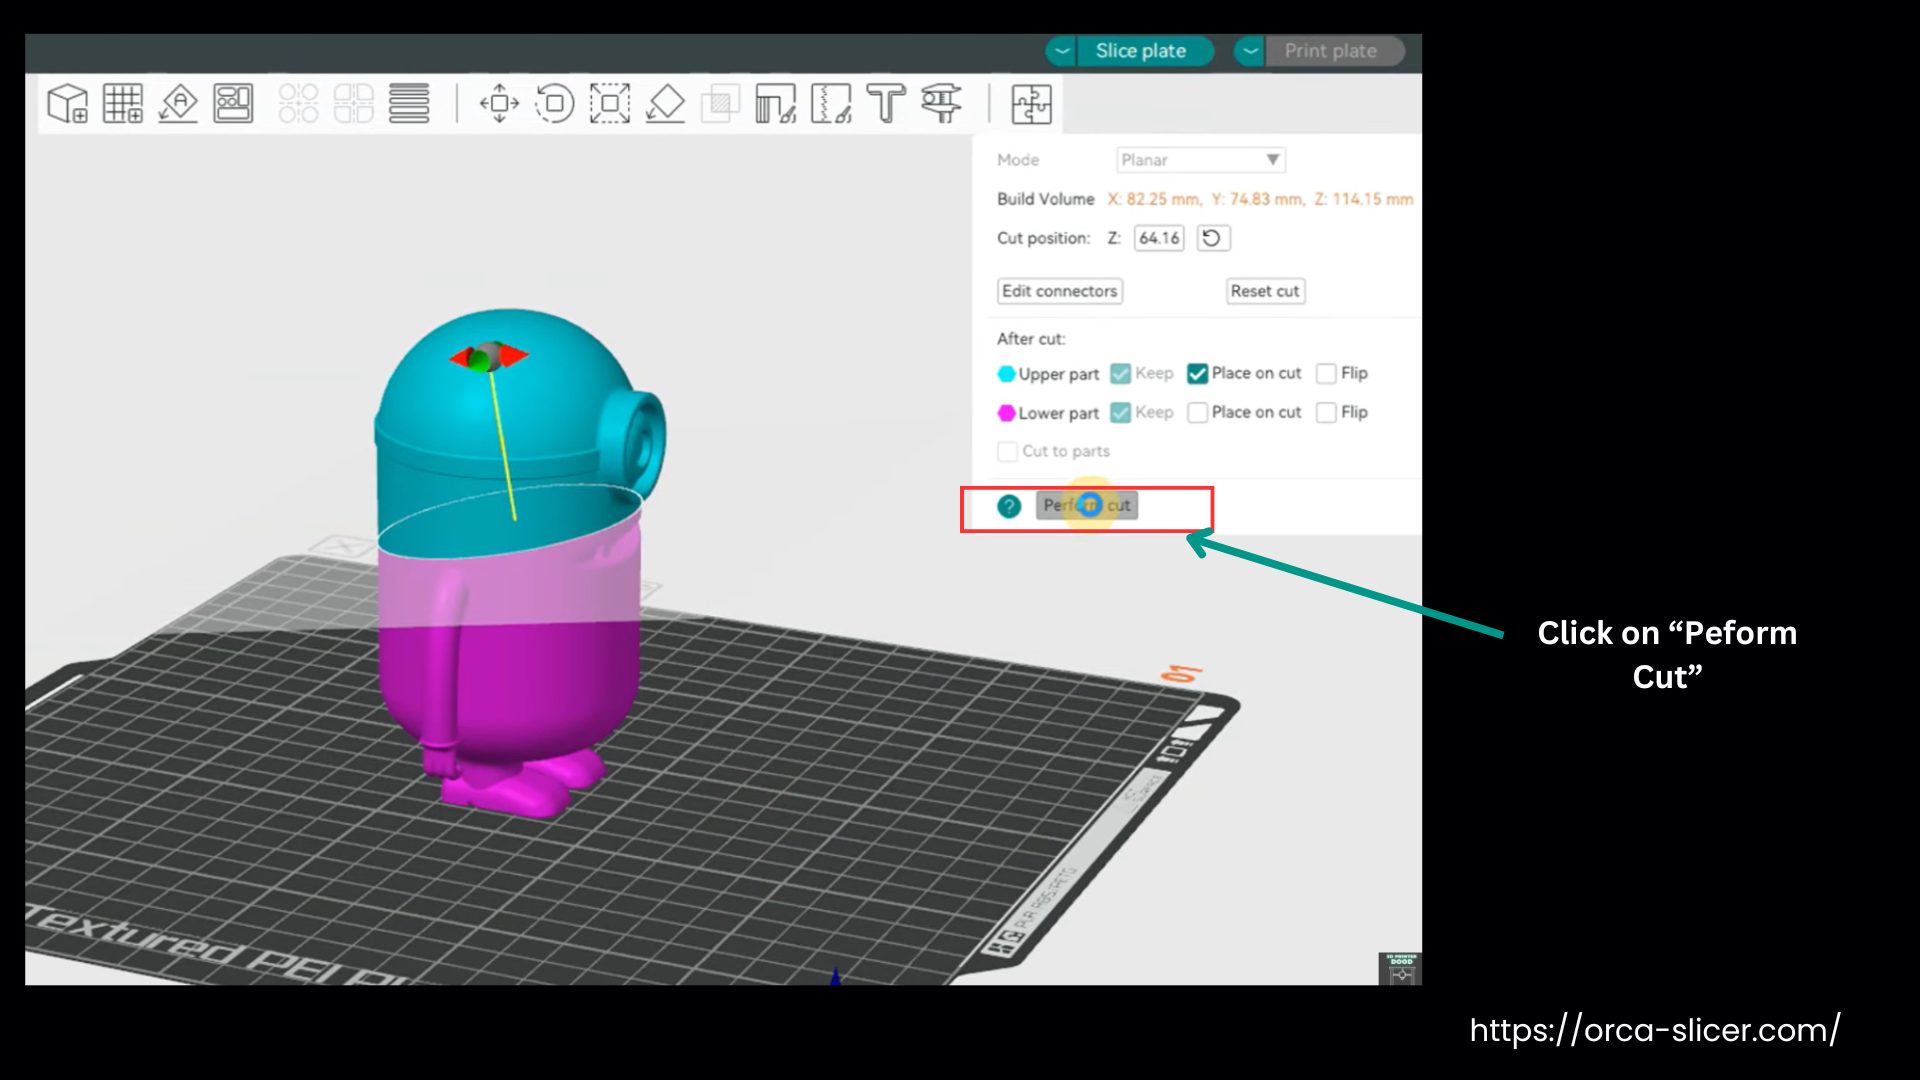
Perform the Cut
- Click Perform Cut. You’ll now see two separate models, split exactly where you positioned the cut. This is useful for printing large models in smaller sections or for multi-color projects.
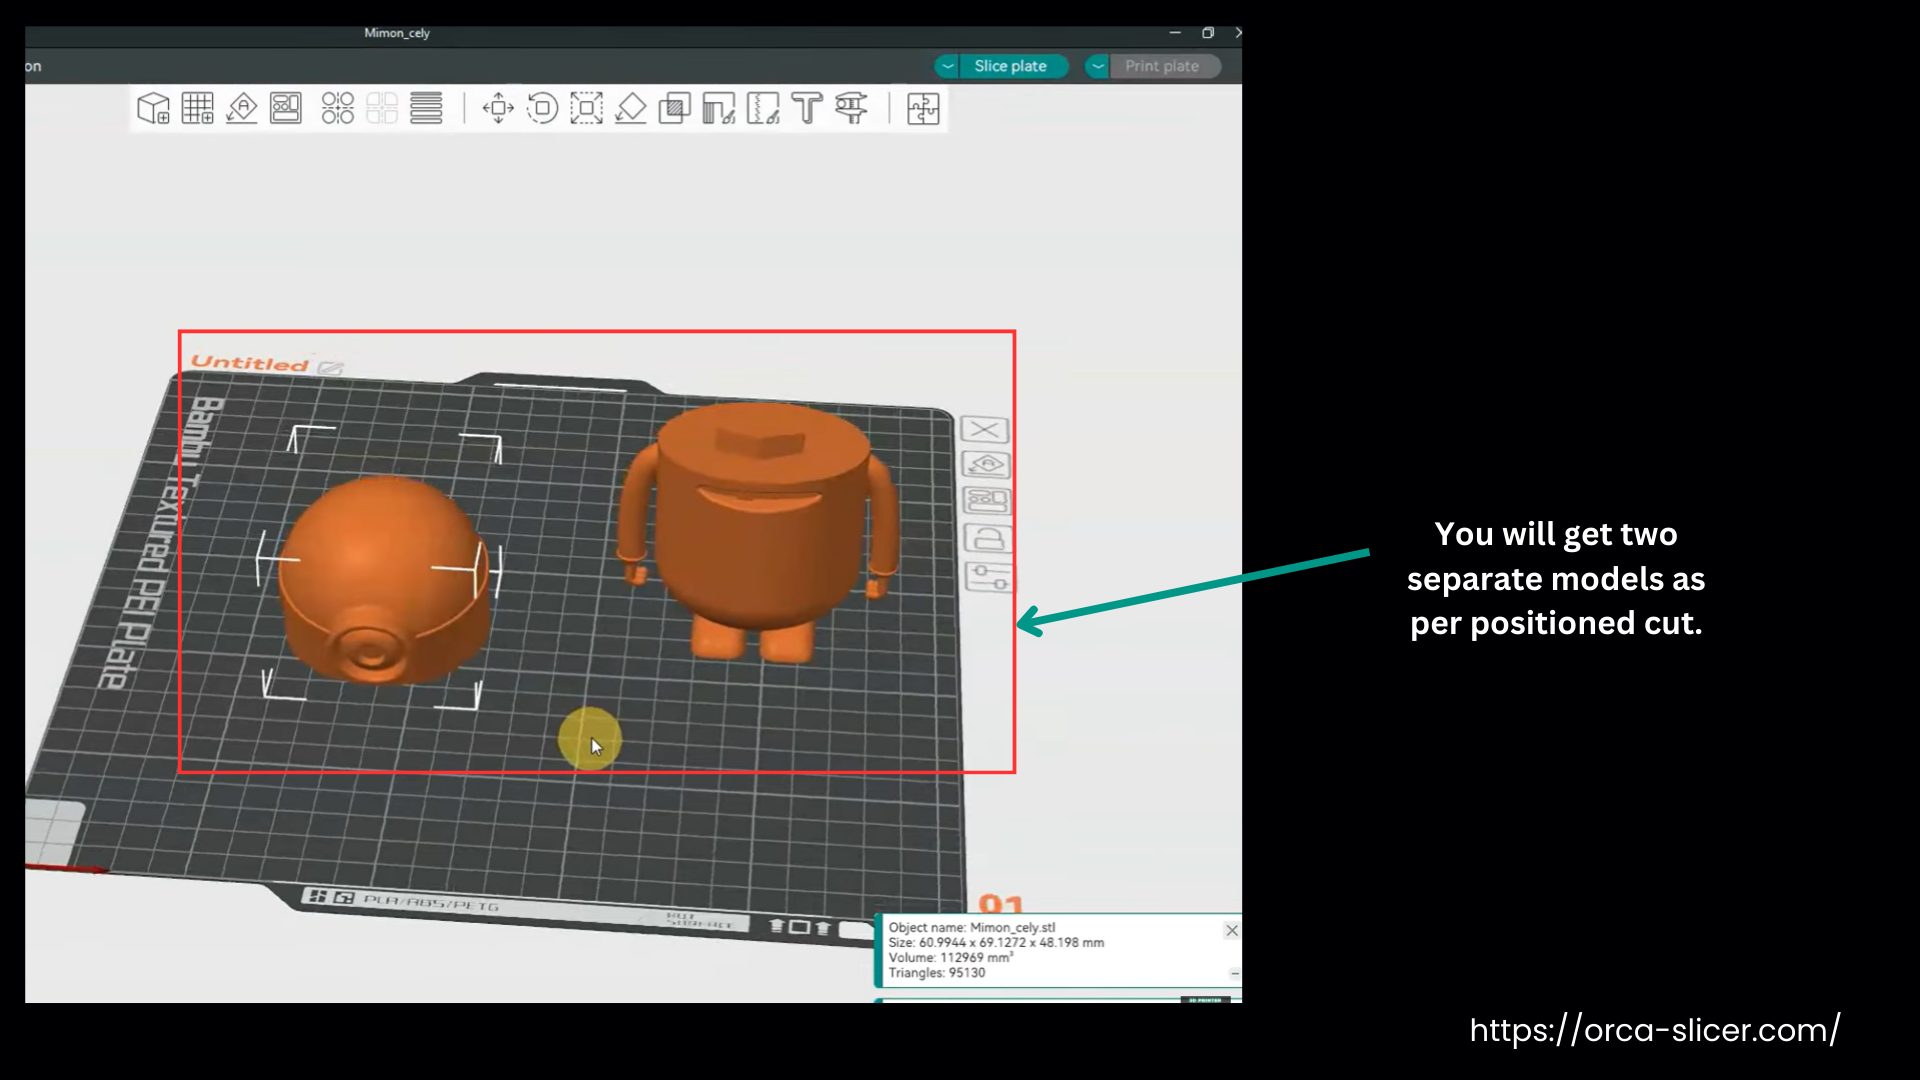
And that’s how you cut a model into multiple parts in Orca Slicer and add connectors to join them together.
How to Merge Objects in Orca Slicer?
Orca Slicer inherits the merging objects attribute from the Bamboo Studio. It lets you treat multiple models as a single piece for printing.
Import all the parts you want to merge and position them where you want by moving, rotating, or aligning. Grab all the positioned models you want to merge. Hold Ctrl and click each one, or pick them from the object list.
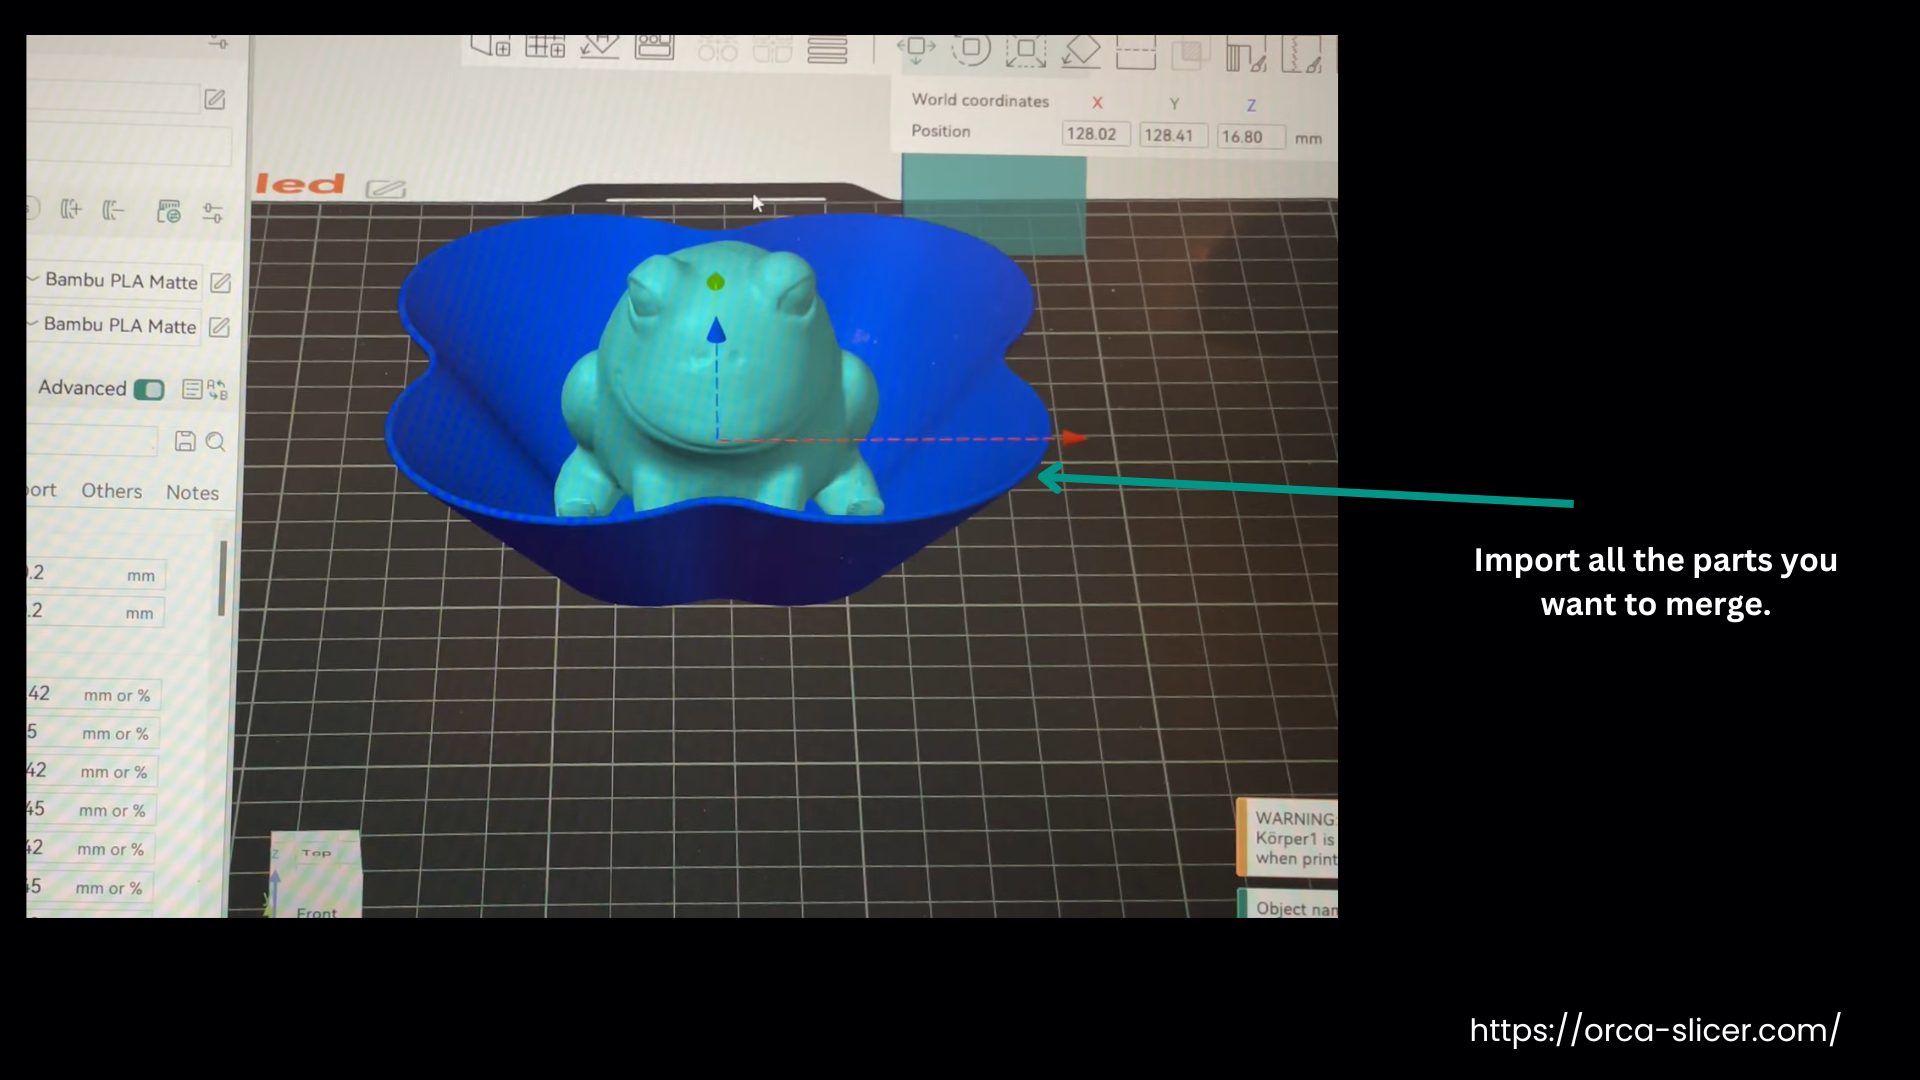
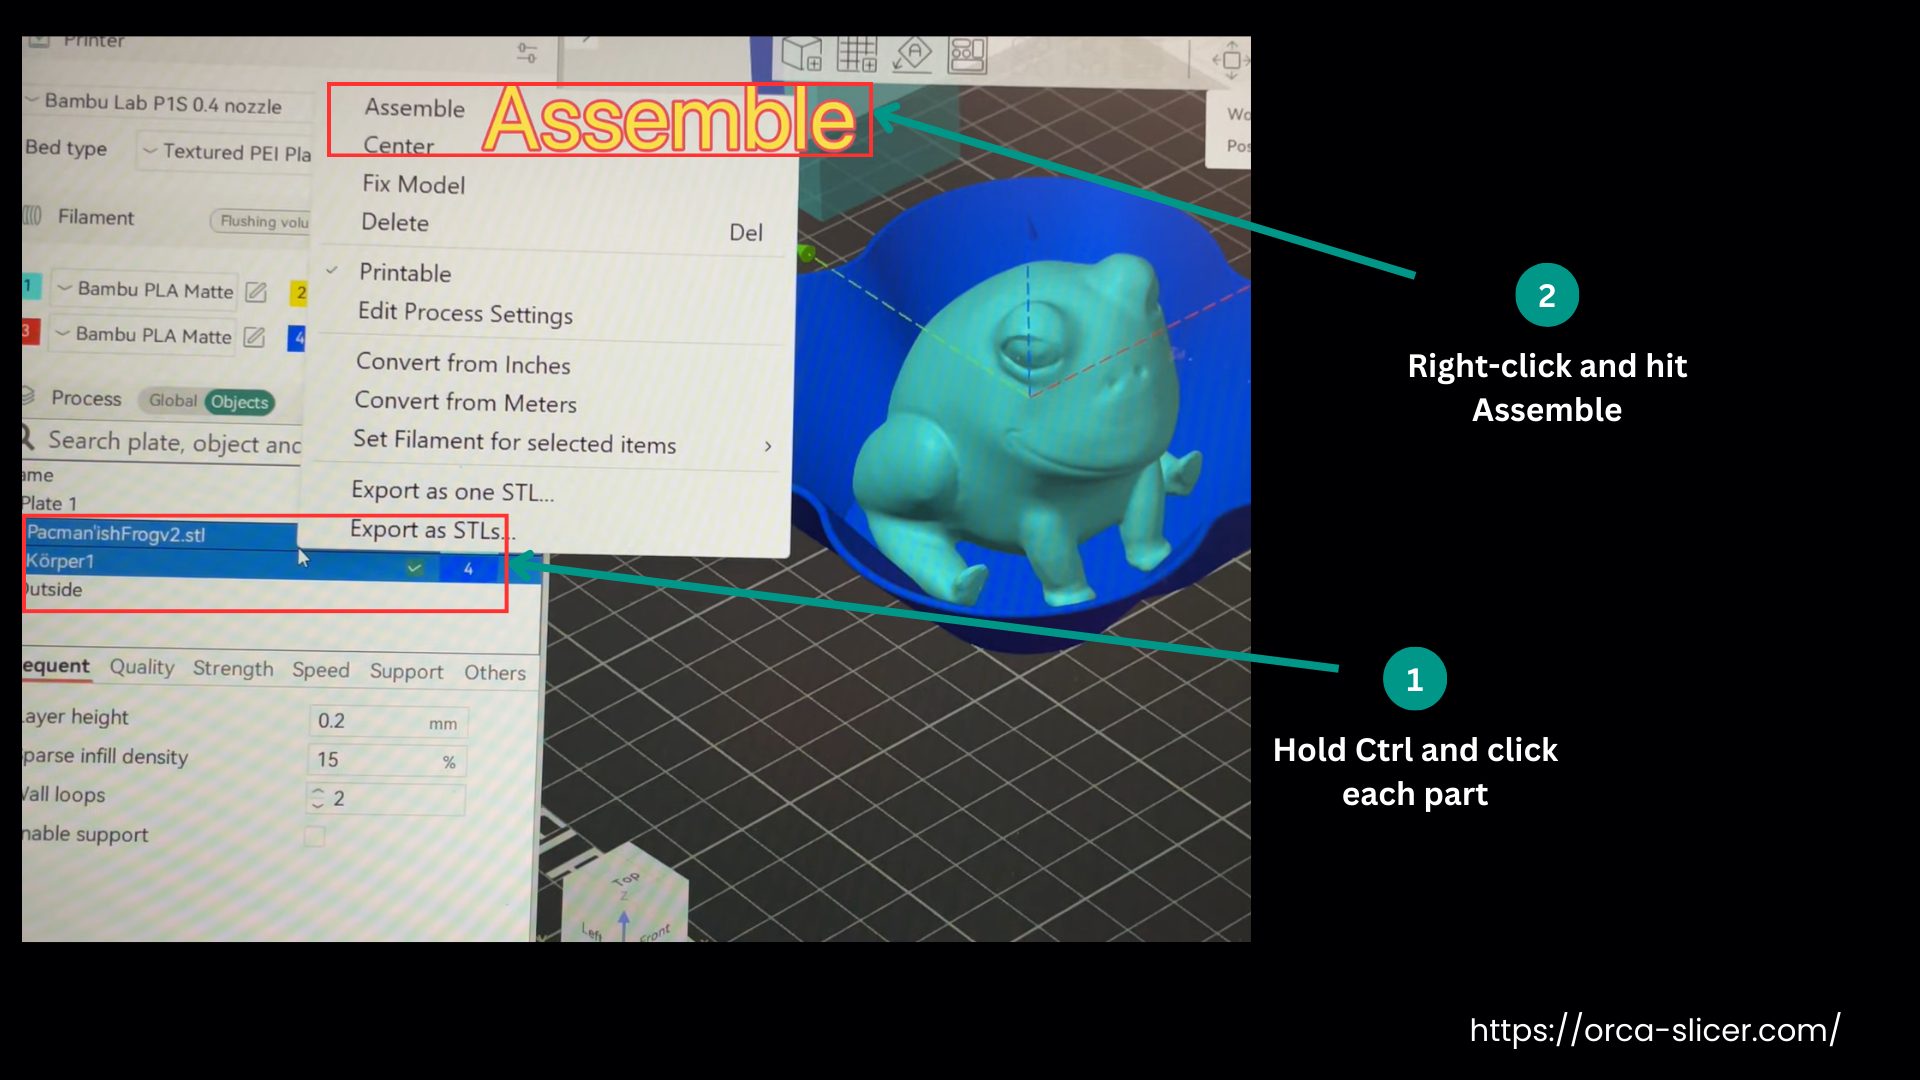
Then right-click and hit Assemble. After that, Orca Slicer will treat them like one model for slicing, but you can still move or tweak each piece if you need to.
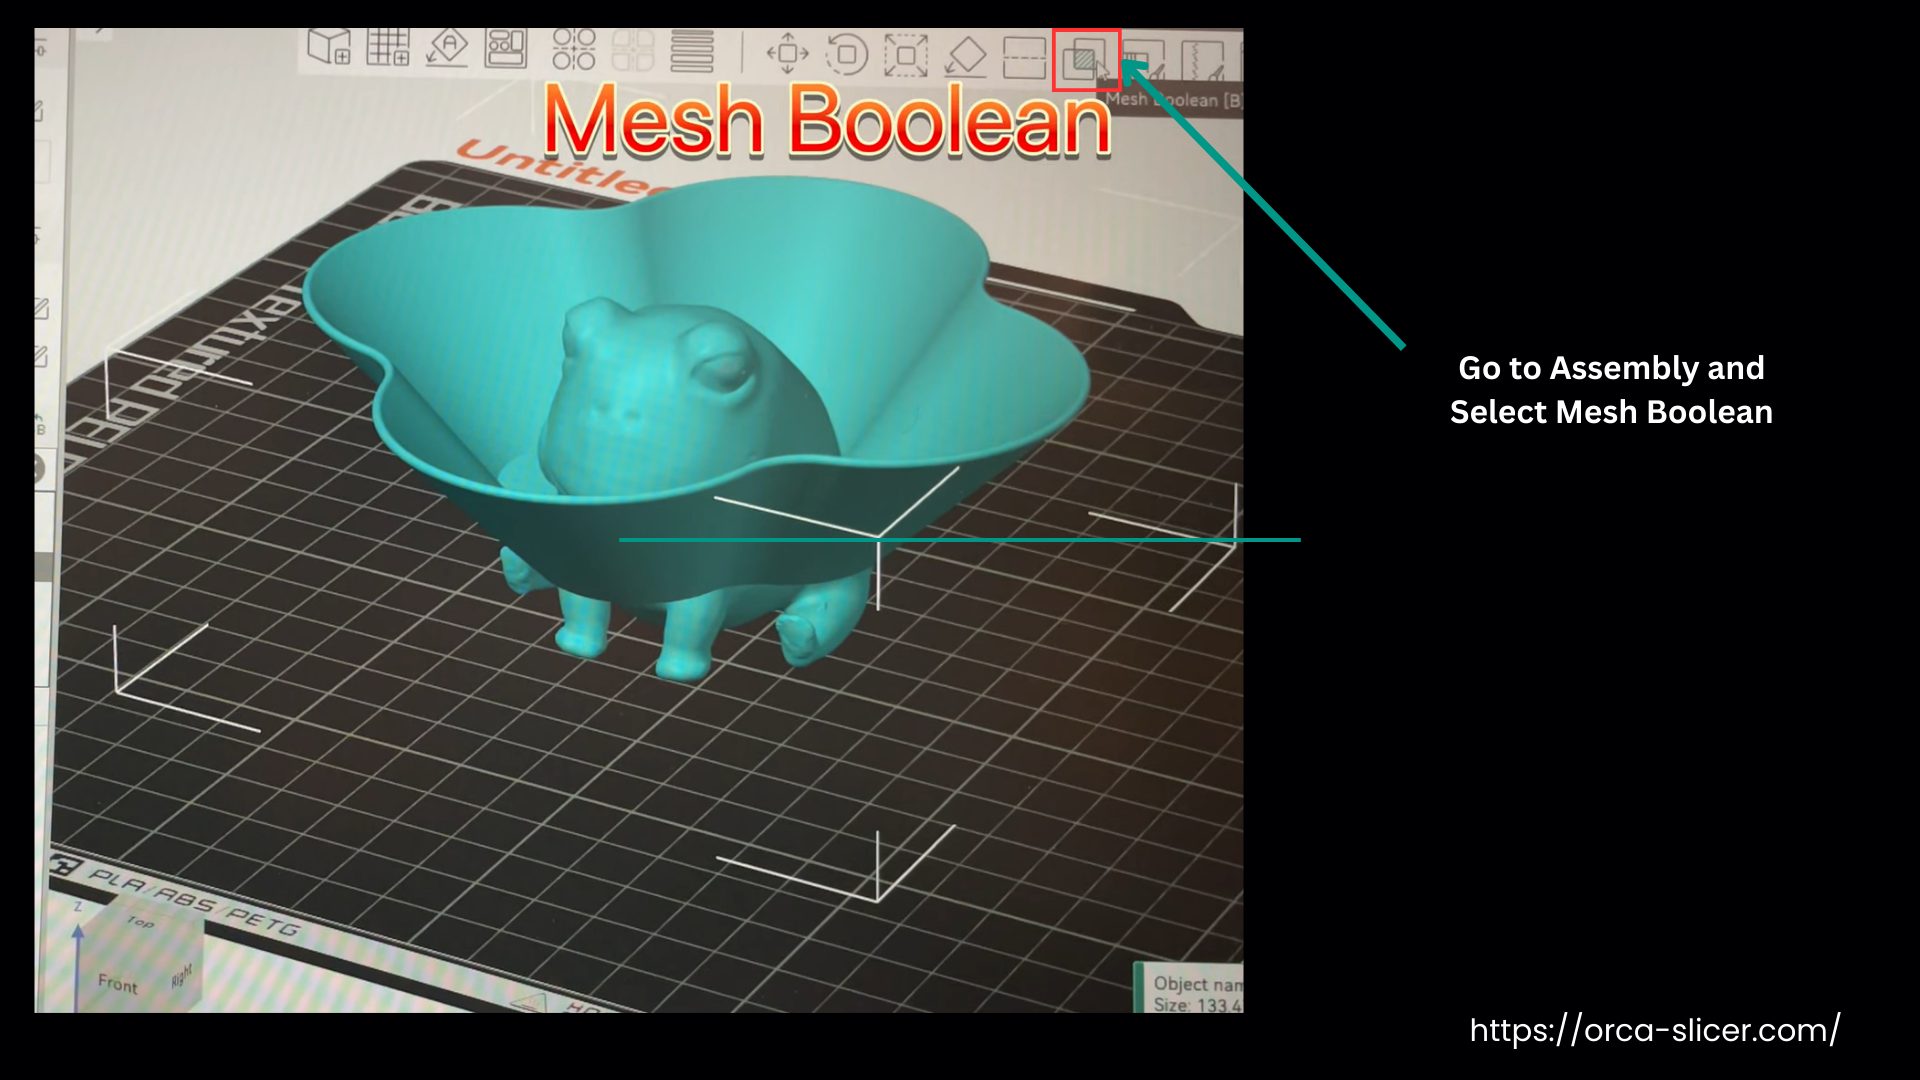
The next step is to combine the merged models into a single solid mesh for printing. Choose Assembly (LHS), and go to Mesh Boolean → Union, select each part, and click Union. This may take a few seconds, but once finished, the objects are fully combined and ready for slicing your model as usual.
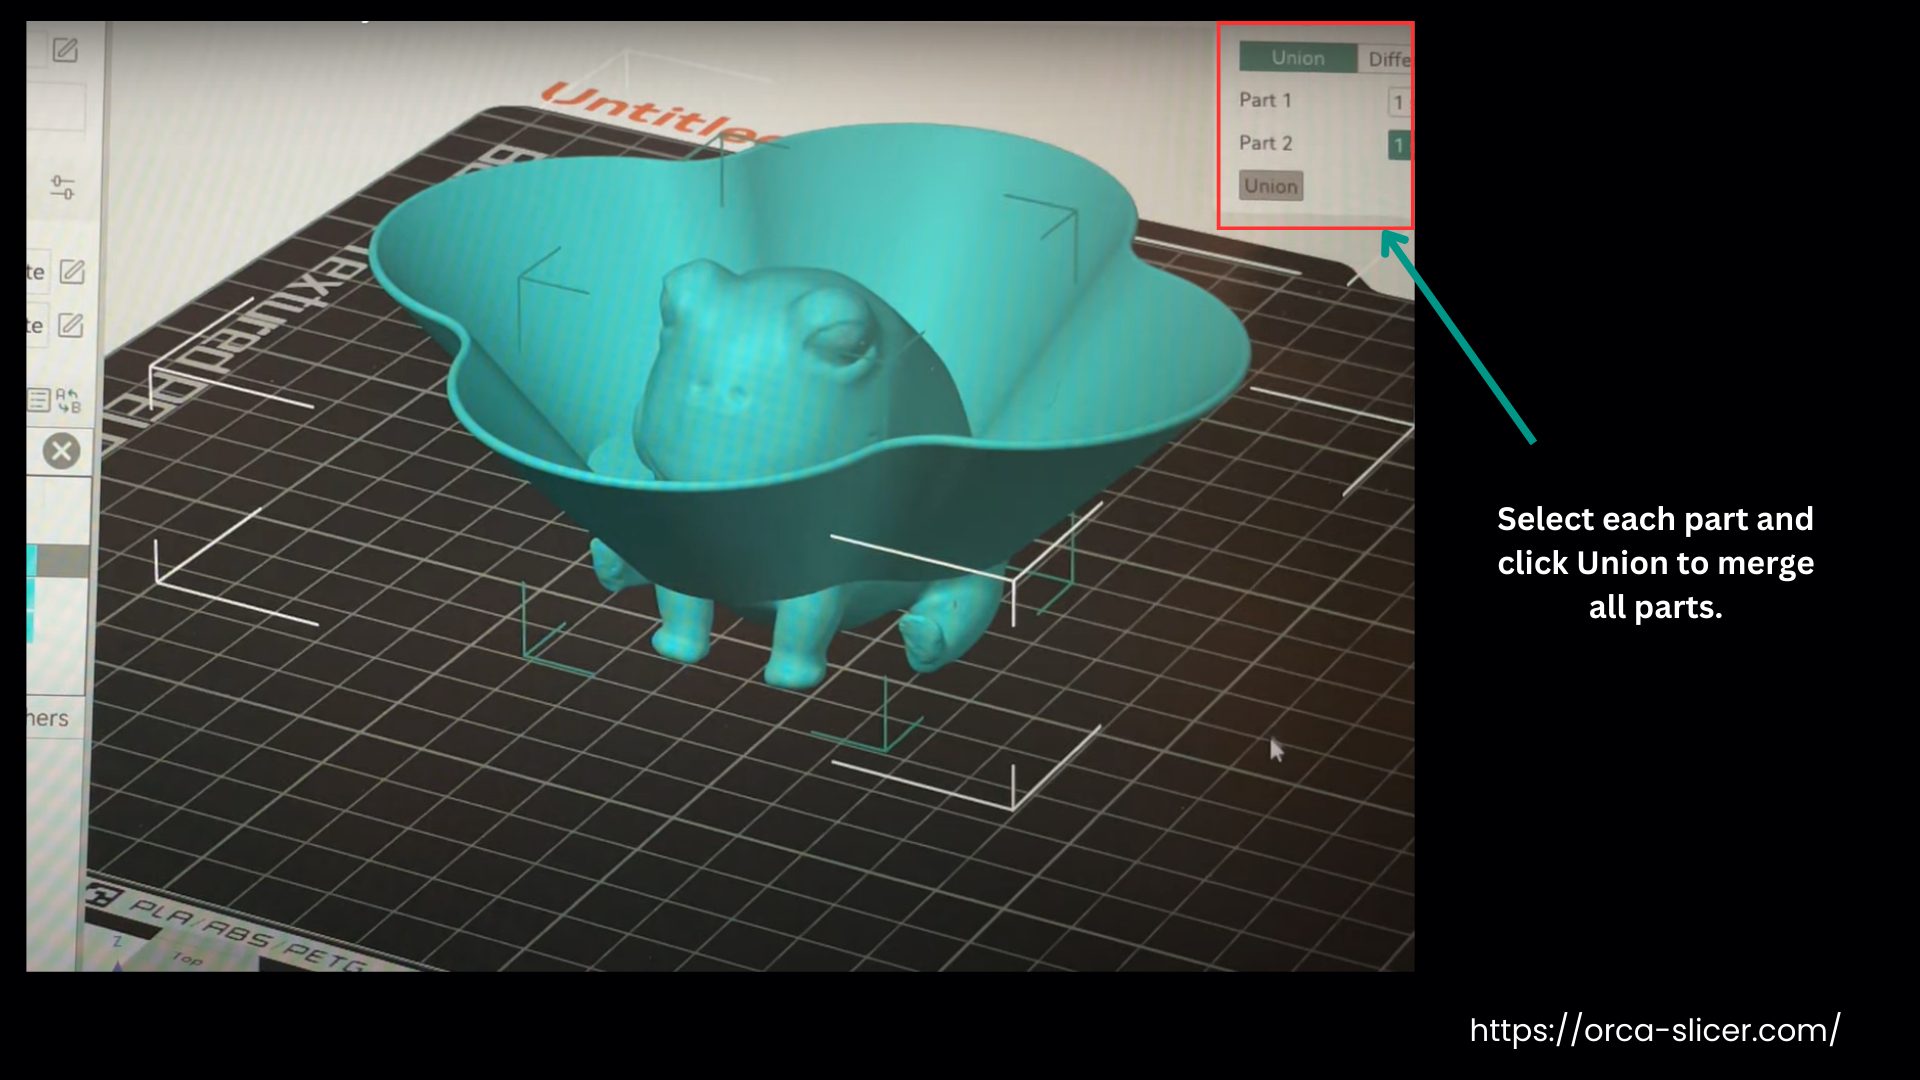
This trick is super handy if you’re printing big models in parts or just want to combine smaller pieces into one print. Make sure the models are a little bit overlapping or touching so they stick together. And that’s it, you’ve merged your objects, ready to slice and print as one solid model.
How to Add a Pause in Orca Slicer?
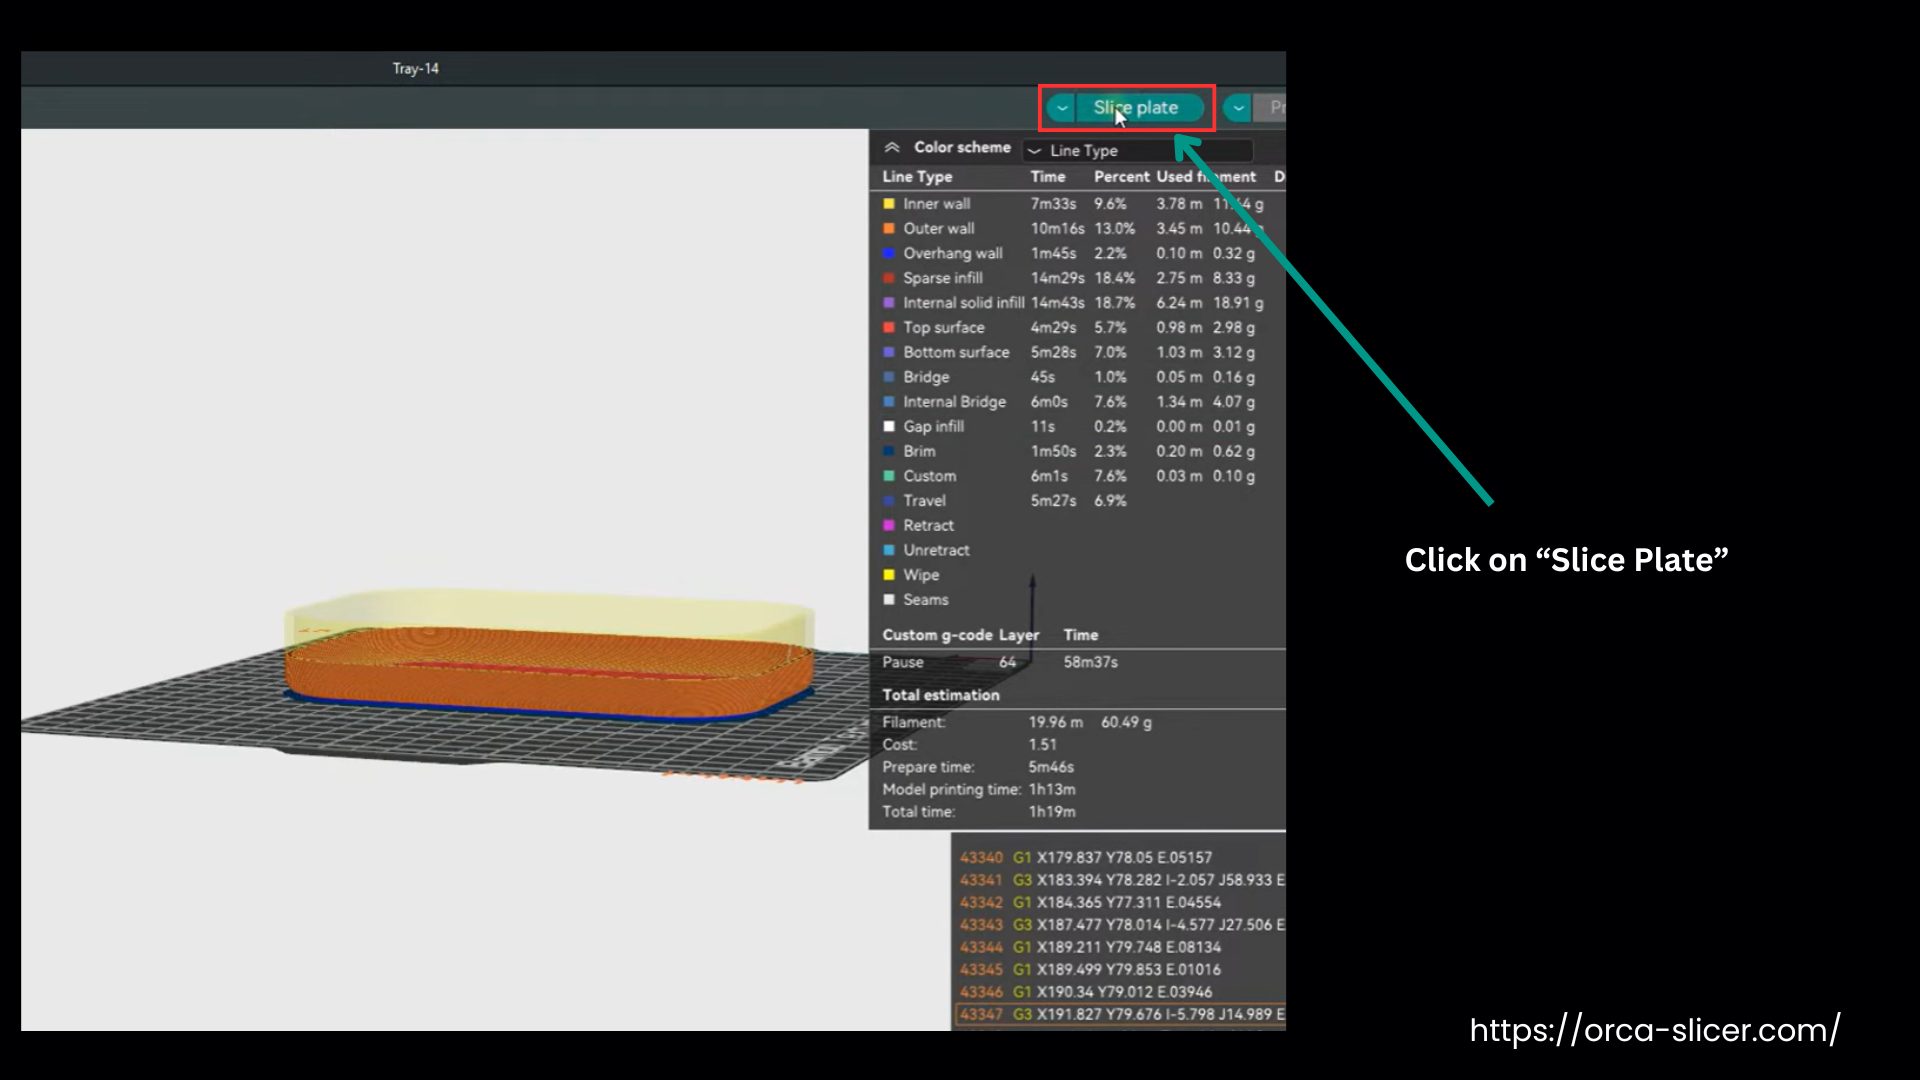
A pause is added in Orca when we want to make some changes mid-print. To add a pause, open Orca Slicer and bring in your file. Once you have completely finished your file and you have it ready to print, go over to the Preview tab to examine the layers from bottom to top.

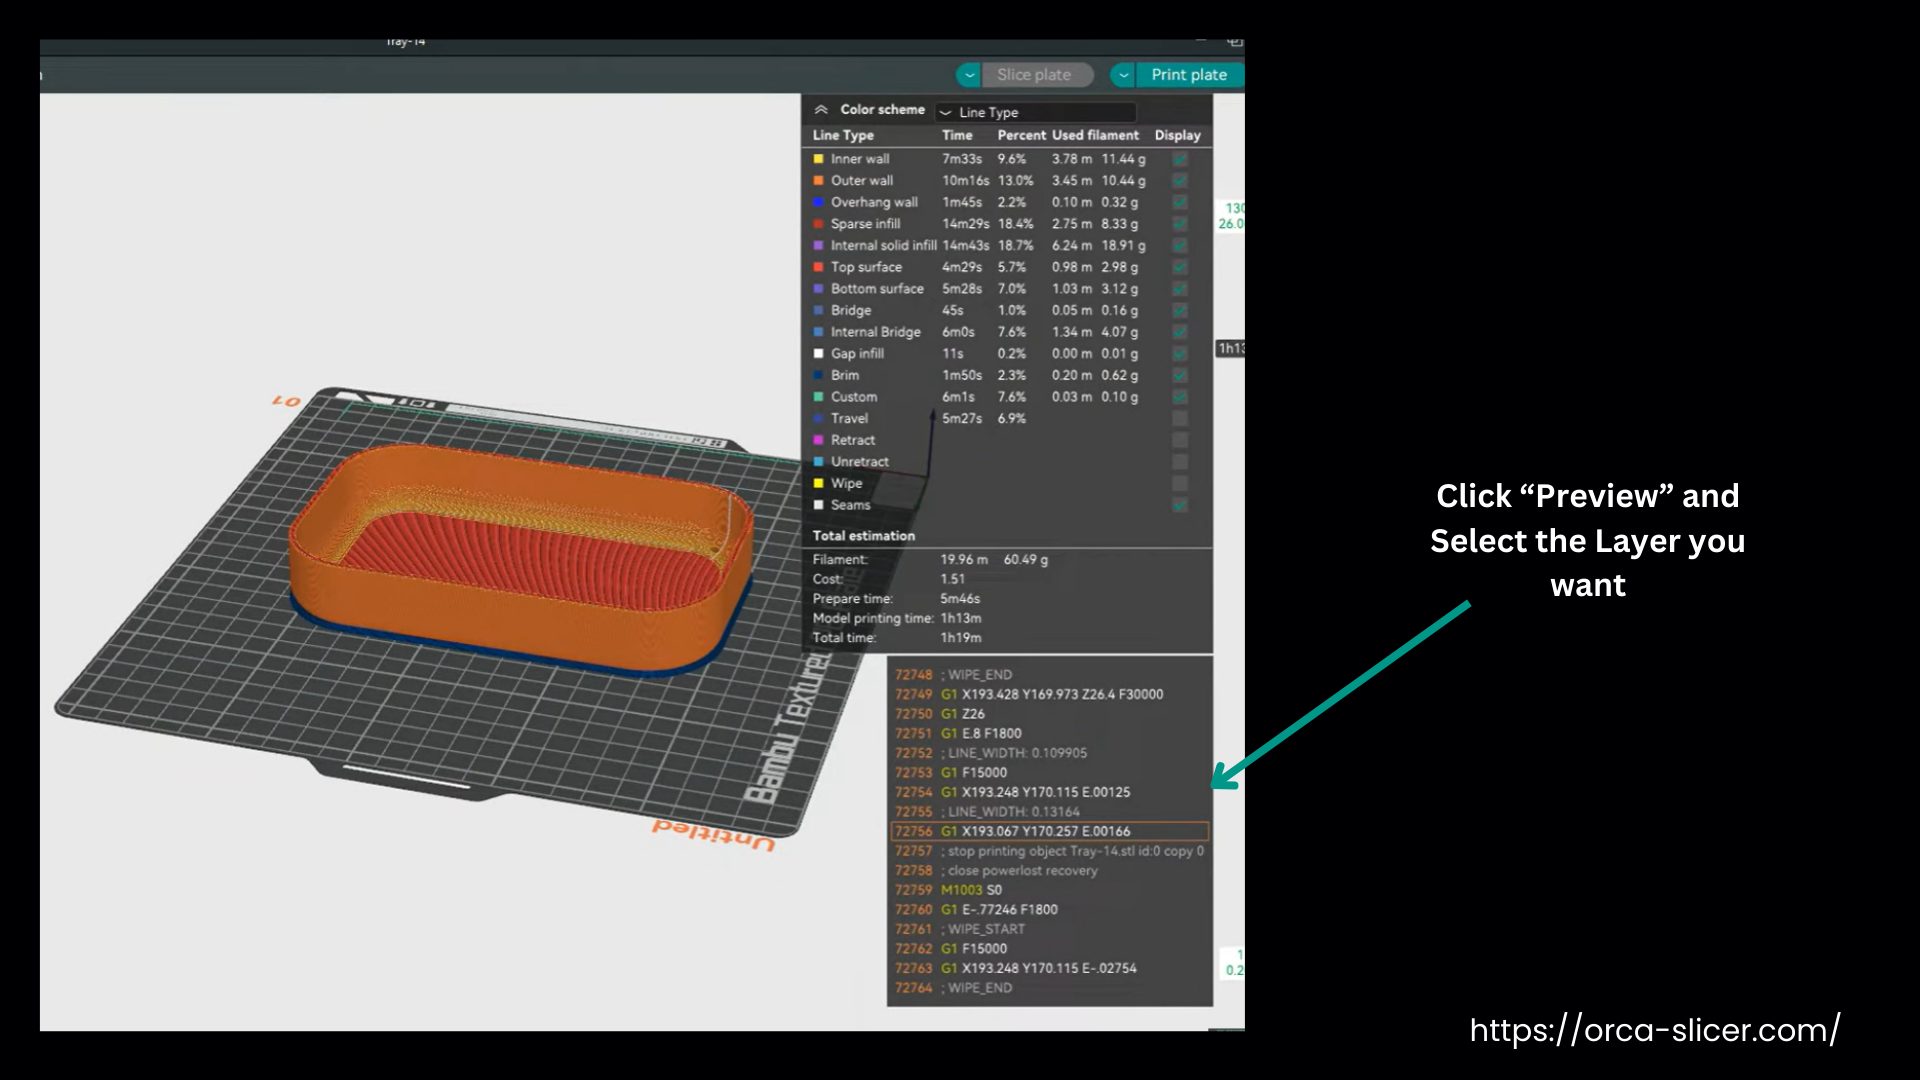
Figure out from this preview where you need to add the pause in the layering, such as when switching filament colors or inserting an object. After you identify the layers where you need the pause, right-click on that layer and select Add Pause.
The next step is to click on Slice Plate in the right-hand corner to reslice and add the G-Code for the pause. Once reslicing is complete, you can return to the Preview tab to verify the pause is in place, and the G-code will show the pause command at the specified layer.

Your model is now ready to print with the pause included to make changes or adjustments mid-print.
How to Add Supports in Orca?
Please watch the video below to learn how to add custom supports in Orca Slicer. It is very easy to understand, step by step, and will make your job easy:
How to Export Orca Slicer Settings?
If you’ve tweaked your printer or print profiles, exporting your Orca Slicer settings lets you keep a backup, pass them on, or move them to another machine.
1. Open Orca Slicer
- Launch the Orca Slicer software on your computer.
2. Access the Export Menu:
- In the top-left corner, click on “File,” then choose “Export” and select “Export Preset Bundle” from the dropdown menu.

3. Choose What to Export:
A window will appear with several options:
- Printer config bundle (.orca_printer): Exports your entire printer setup, including custom printer configurations, connected filaments, and print profiles.
- Filament bundle (.orca_filament): Exports custom filament profiles along with their printer connections.
- Printer presets (.zip): Exports custom printer configurations.
- Filament presets (.zip): Exports custom filament configurations.
- Process presets (.zip): Exports custom print profiles/process presets.
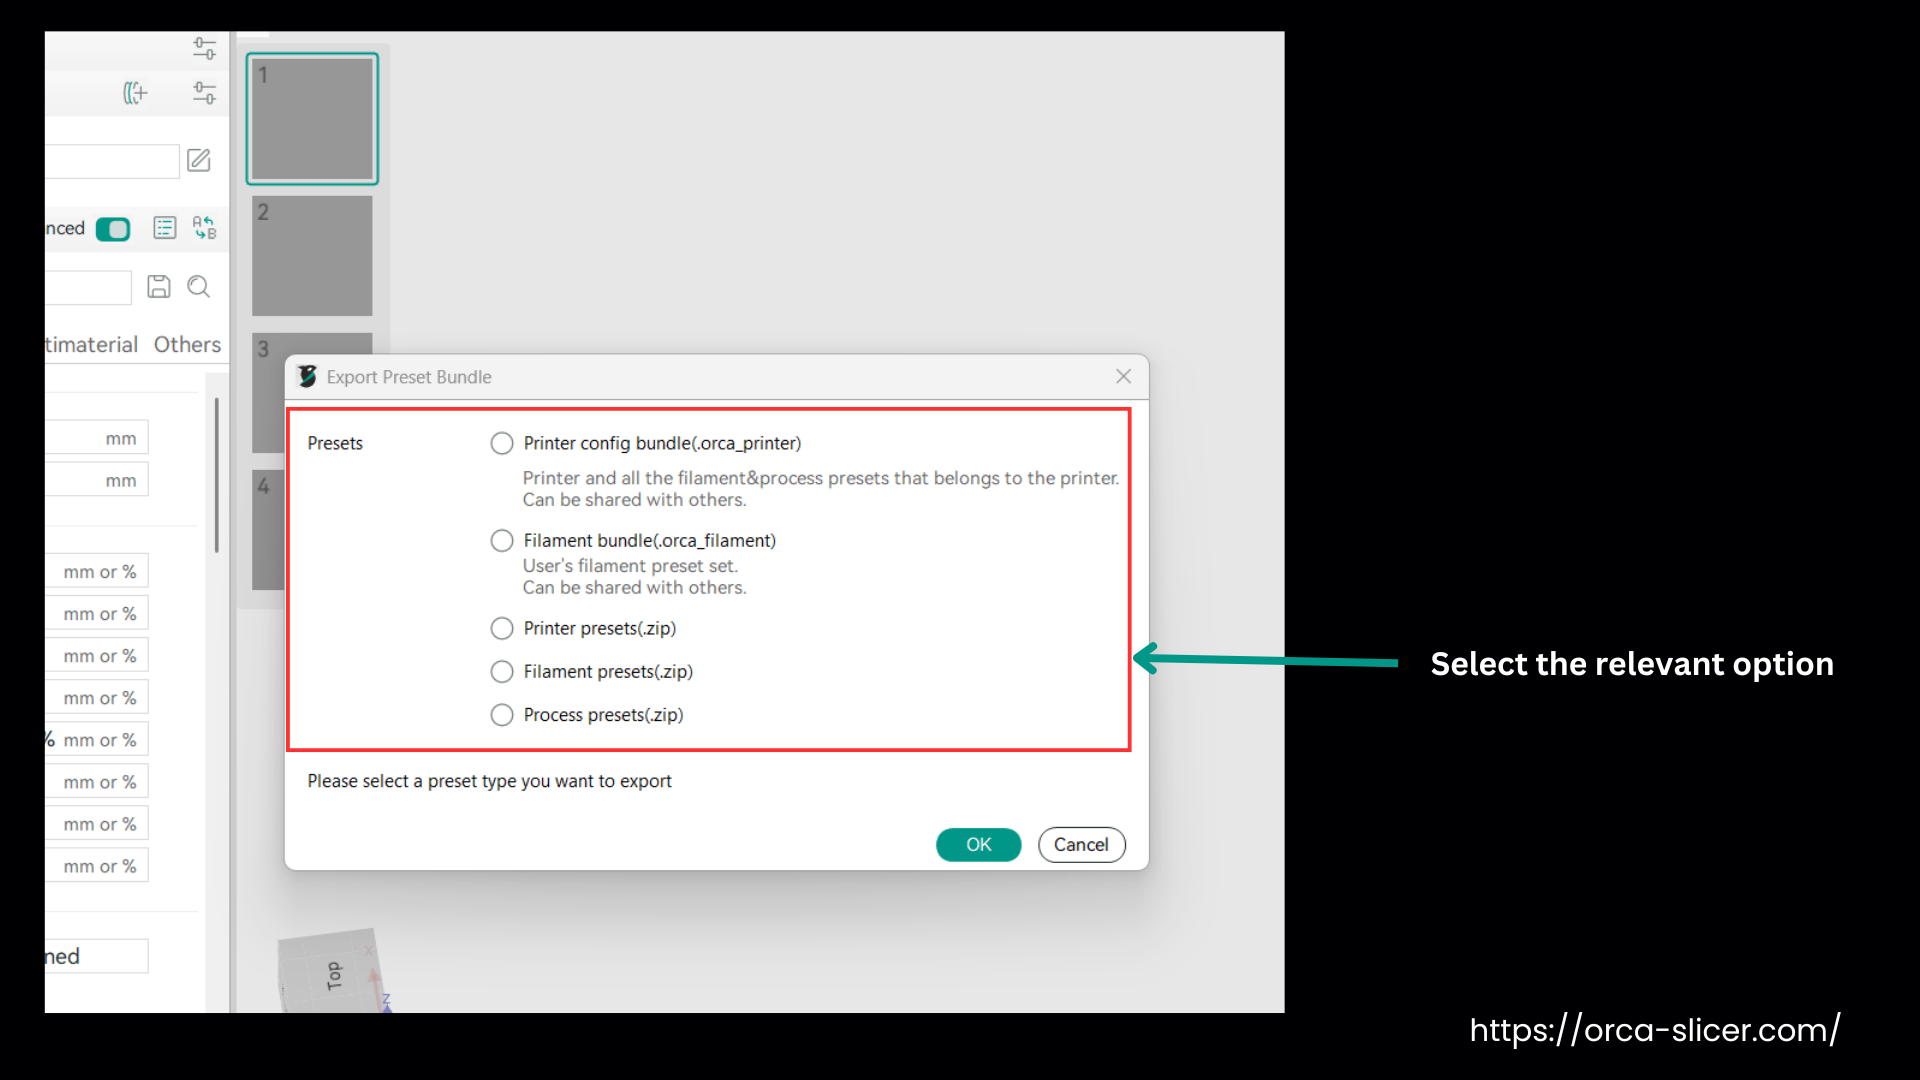
What you are exporting, select the option accordingly.
4. Select the Presets to Export:
- After selecting the type of export, go through the list of configurations and check the presets you’d like to save.
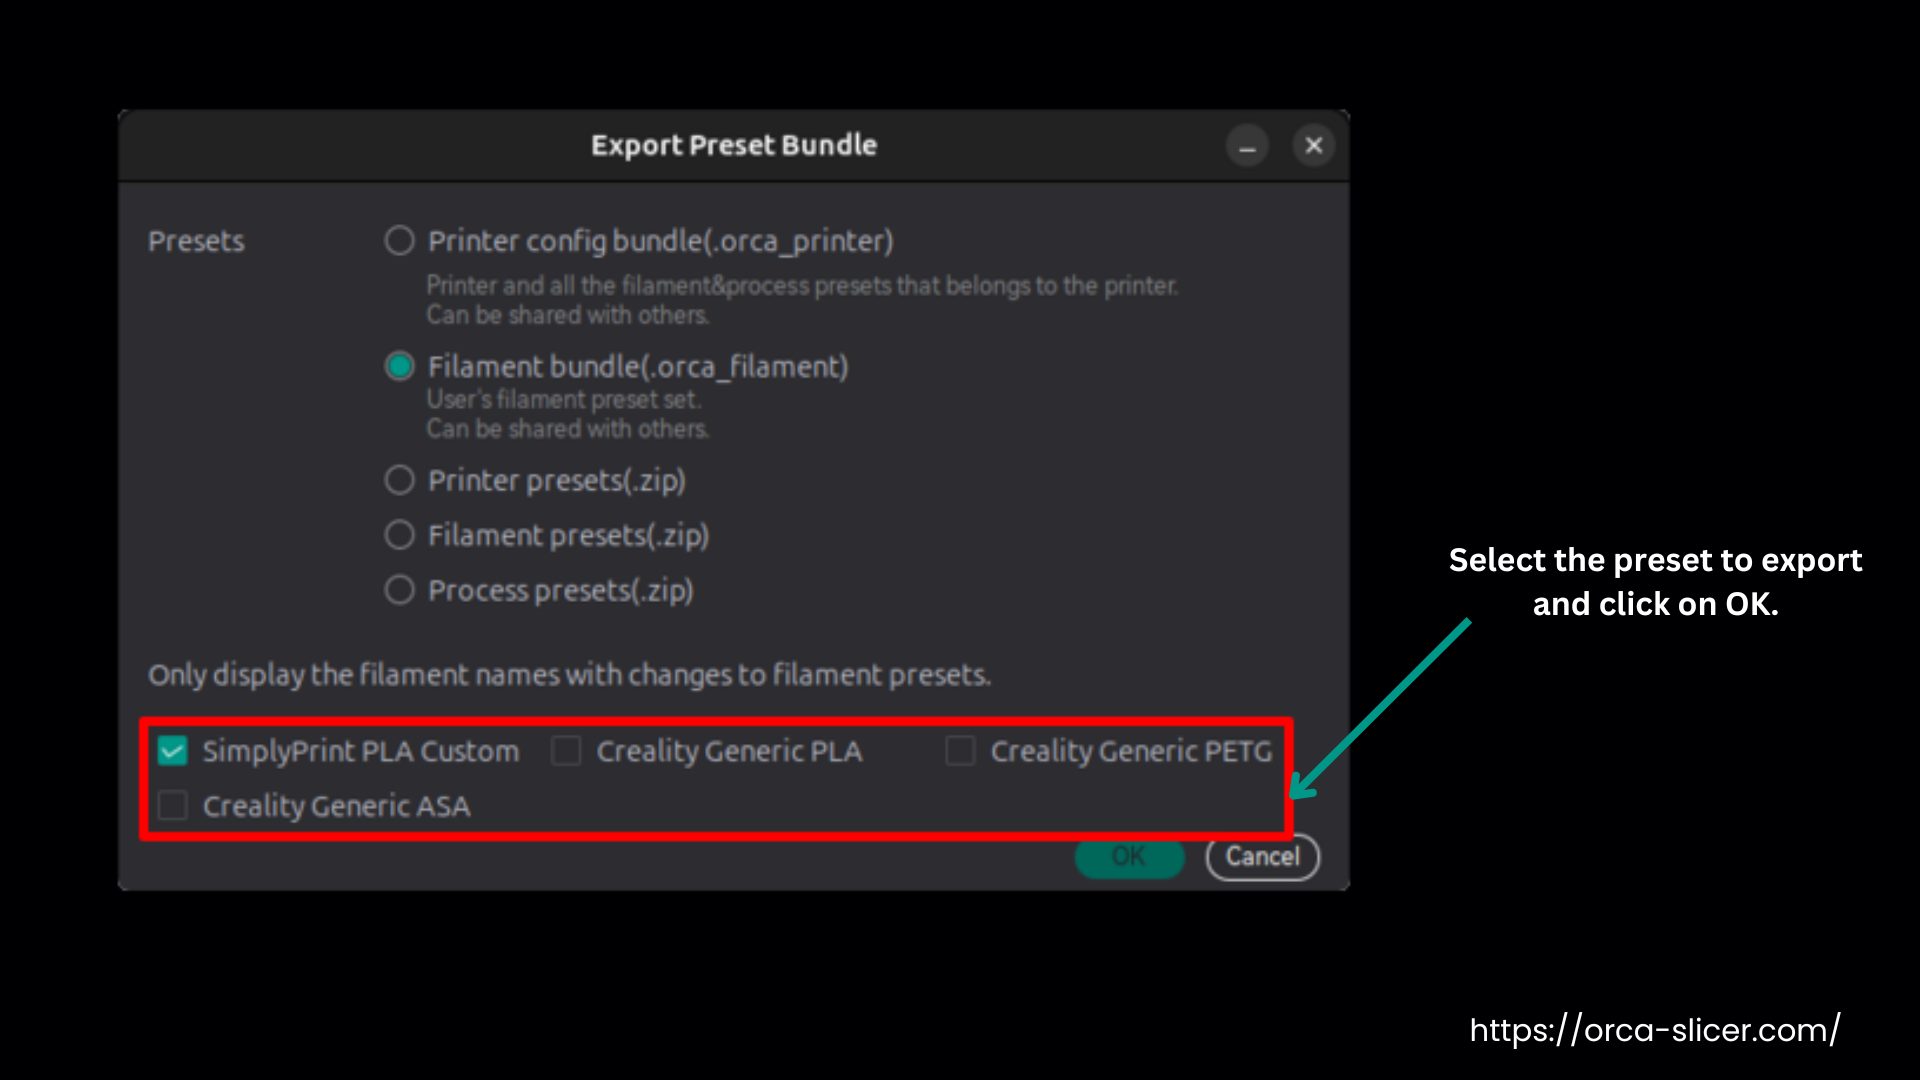
5. Saving the Exported File
- Click OK, pick a folder in the file manager where you can easily find the file later. Name your file and save it.
Summing Up
Orca Slicer is your trusty 3D printing companion, letting you adjust, merge, pause, and fine-tune every print precisely. With the tutorials and guides we’ve covered, we hope you now have a clear roadmap and the answers to the tricky spots that used to hold you back from producing high-quality prints every time.